
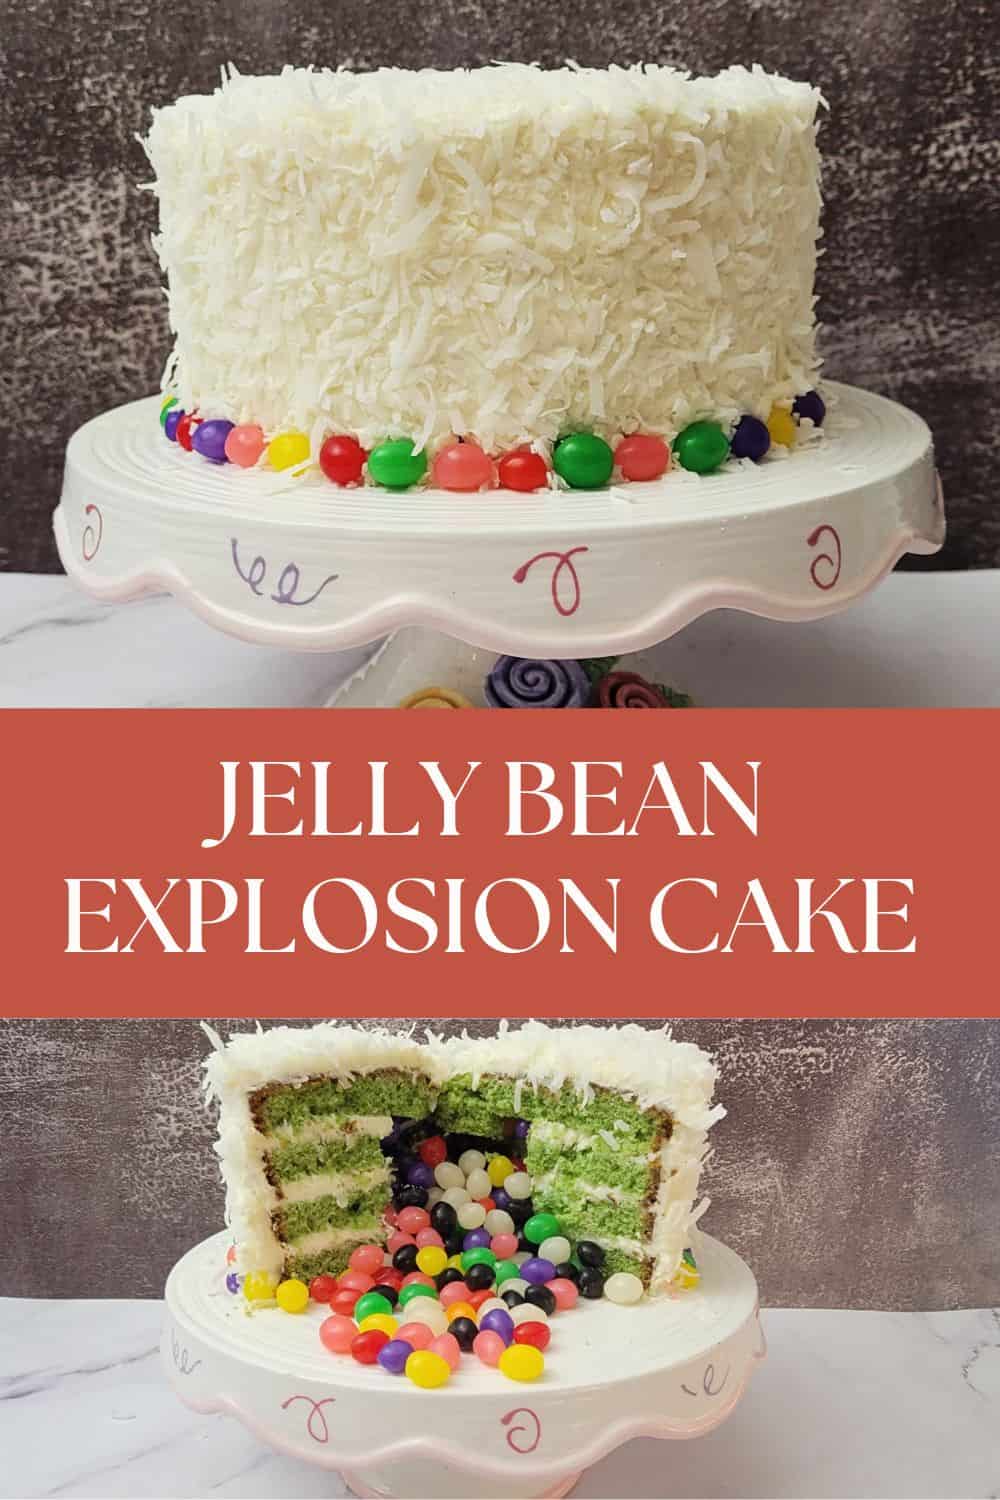
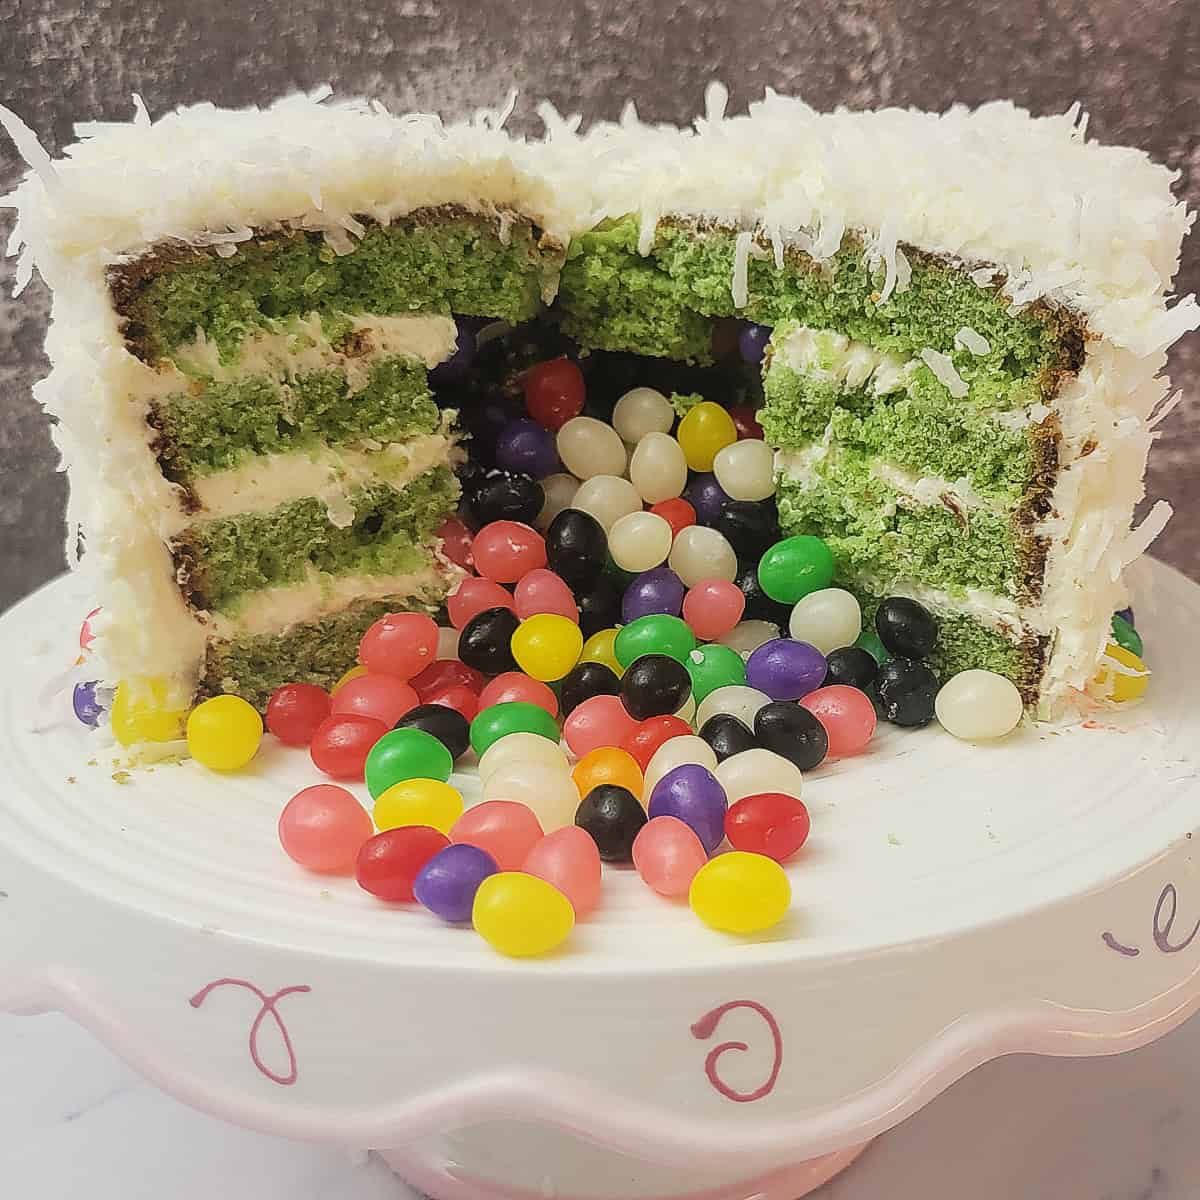
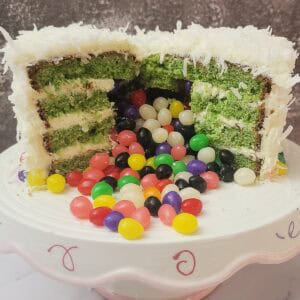
This Jelly Bean Cake is bursting with taste and excellent for Easter! The perfect half? If you lower into it, a hidden stash of jelly beans spills out, making it additional enjoyable and festive. A contact of coconut provides a candy, recent style that makes each chunk even higher.

This publish could include affiliate hyperlinks. Please discuss with the terms web page for extra info.
Whether or not you are internet hosting an Easter brunch or bringing dessert to a household gathering, this jelly bean explosion cake is assured to be a crowd-pleaser. Plus, it is tremendous simple to customise—swap up the cake flavors, colours, and fillings to make it uniquely yours.
Bounce to:
Components
Cake elements
Collect the next elements to make the vanilla cake portion of this dessert:
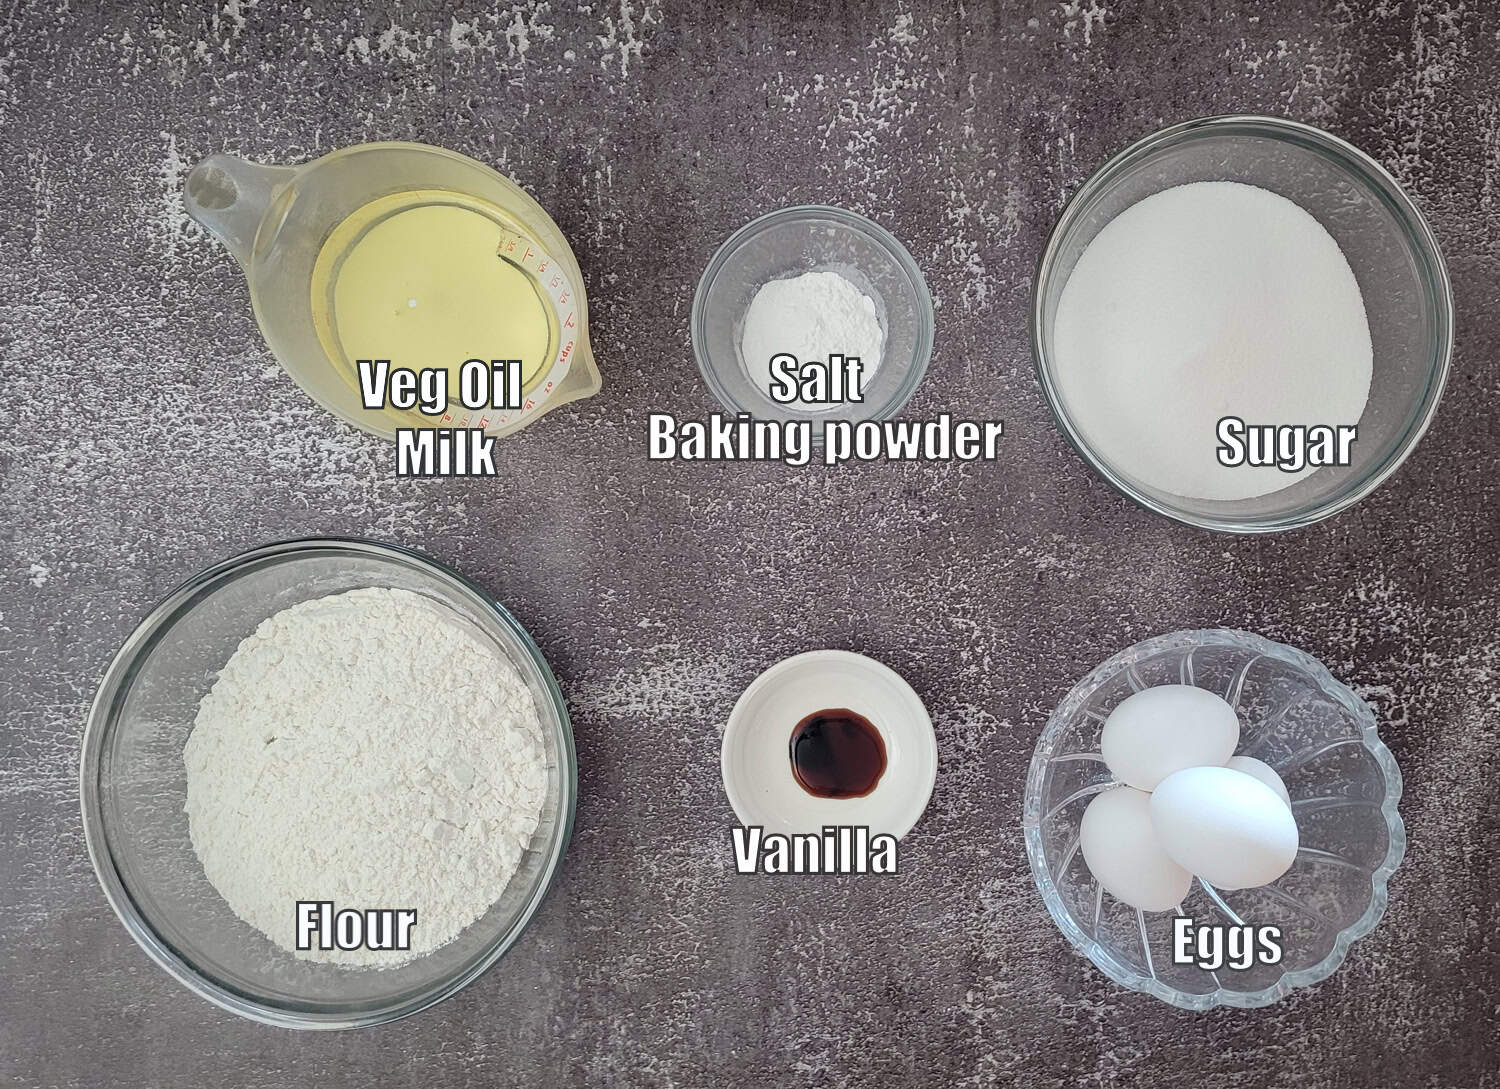
- All-purpose flour – shift flour if essential to take away any lumps
- Baking powder and salt
- Eggs – use massive eggs delivered to room temperature earlier than beginning this recipe
- Granulated sugar
- Vanilla – use vanilla bean paste or pure vanilla extract
- Vegetable oil
- Milk – use full-fat, room temperature milk
- Meals coloring – optionally available
See recipe card for portions.
Cream cheese butter cream and filling directions
To complete off your Jelly Bean Cake, you will want these elements for the frosting, coconut topping, and shock filling:
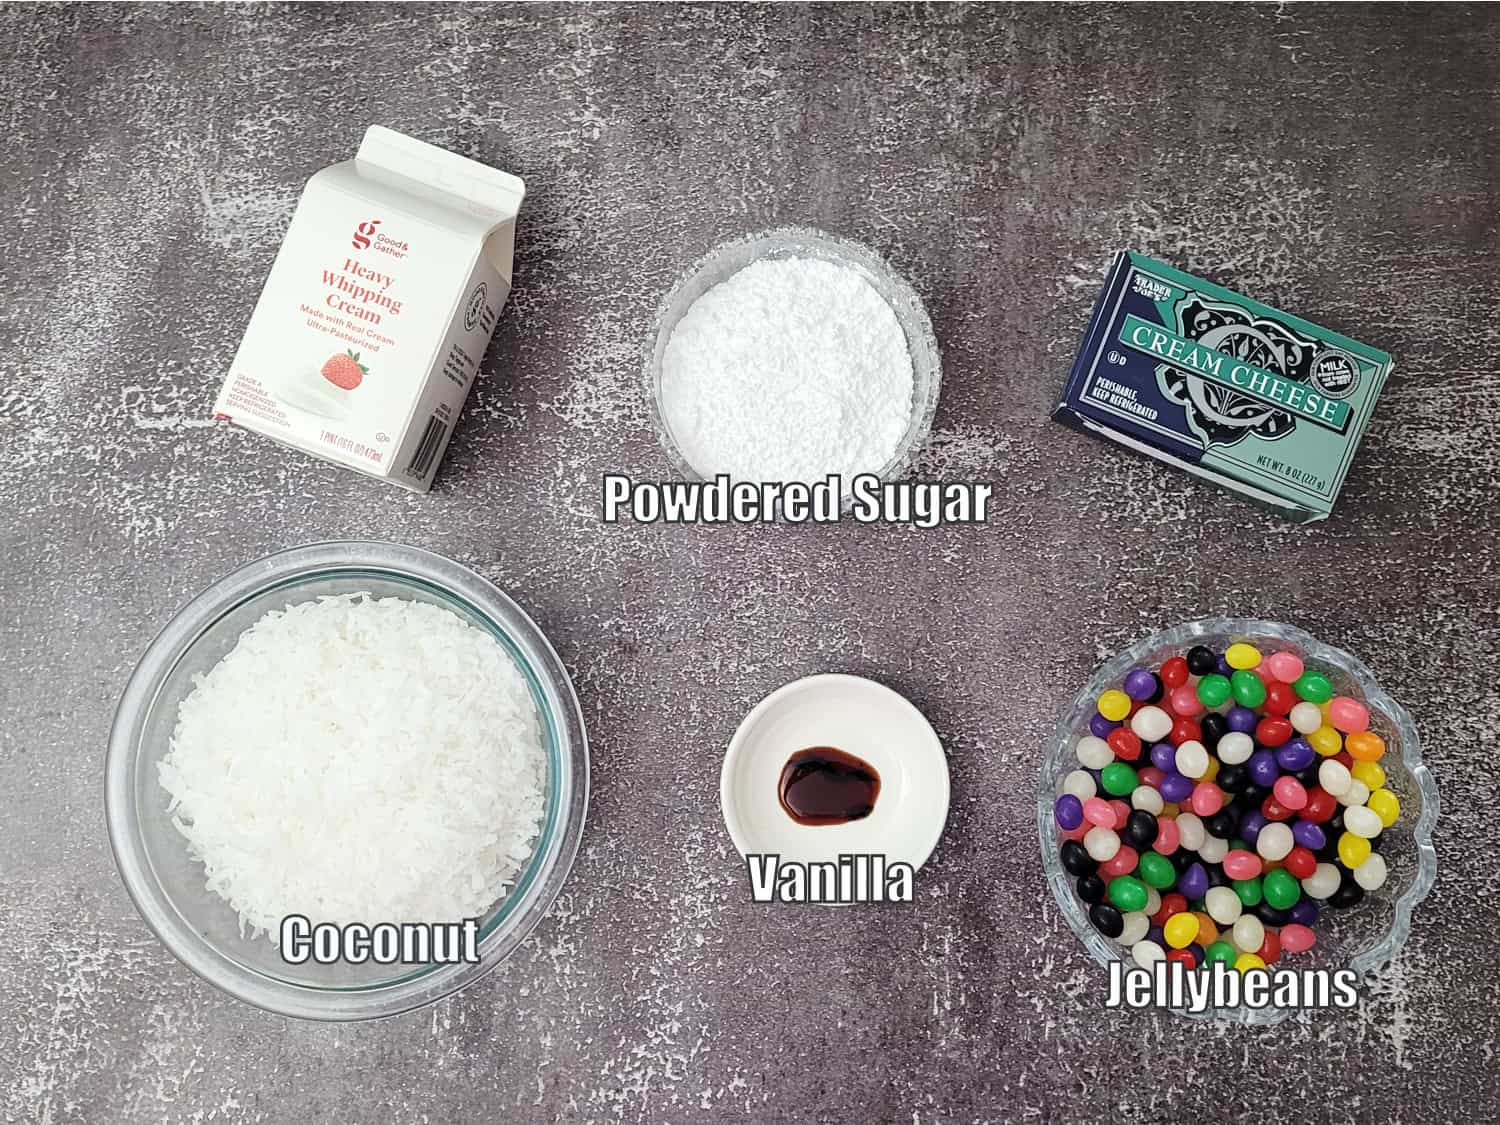
- Cream Cheese – use full-fat cream cheese and soften earlier than beginning filling recipe.
- Whipping Cream
- Powdered sugar – sift sugar if essential to take away any lumps
- Coconut – use sweetened, shredded coconut.
- Jelly beans – use your favourite jelly bean model
See recipe card for portions.
Directions
Cake directions
Step one in making this recipe is to bake the cake. Observe the directions rigorously, and let the cake cool fully earlier than eradicating it from the baking pans.
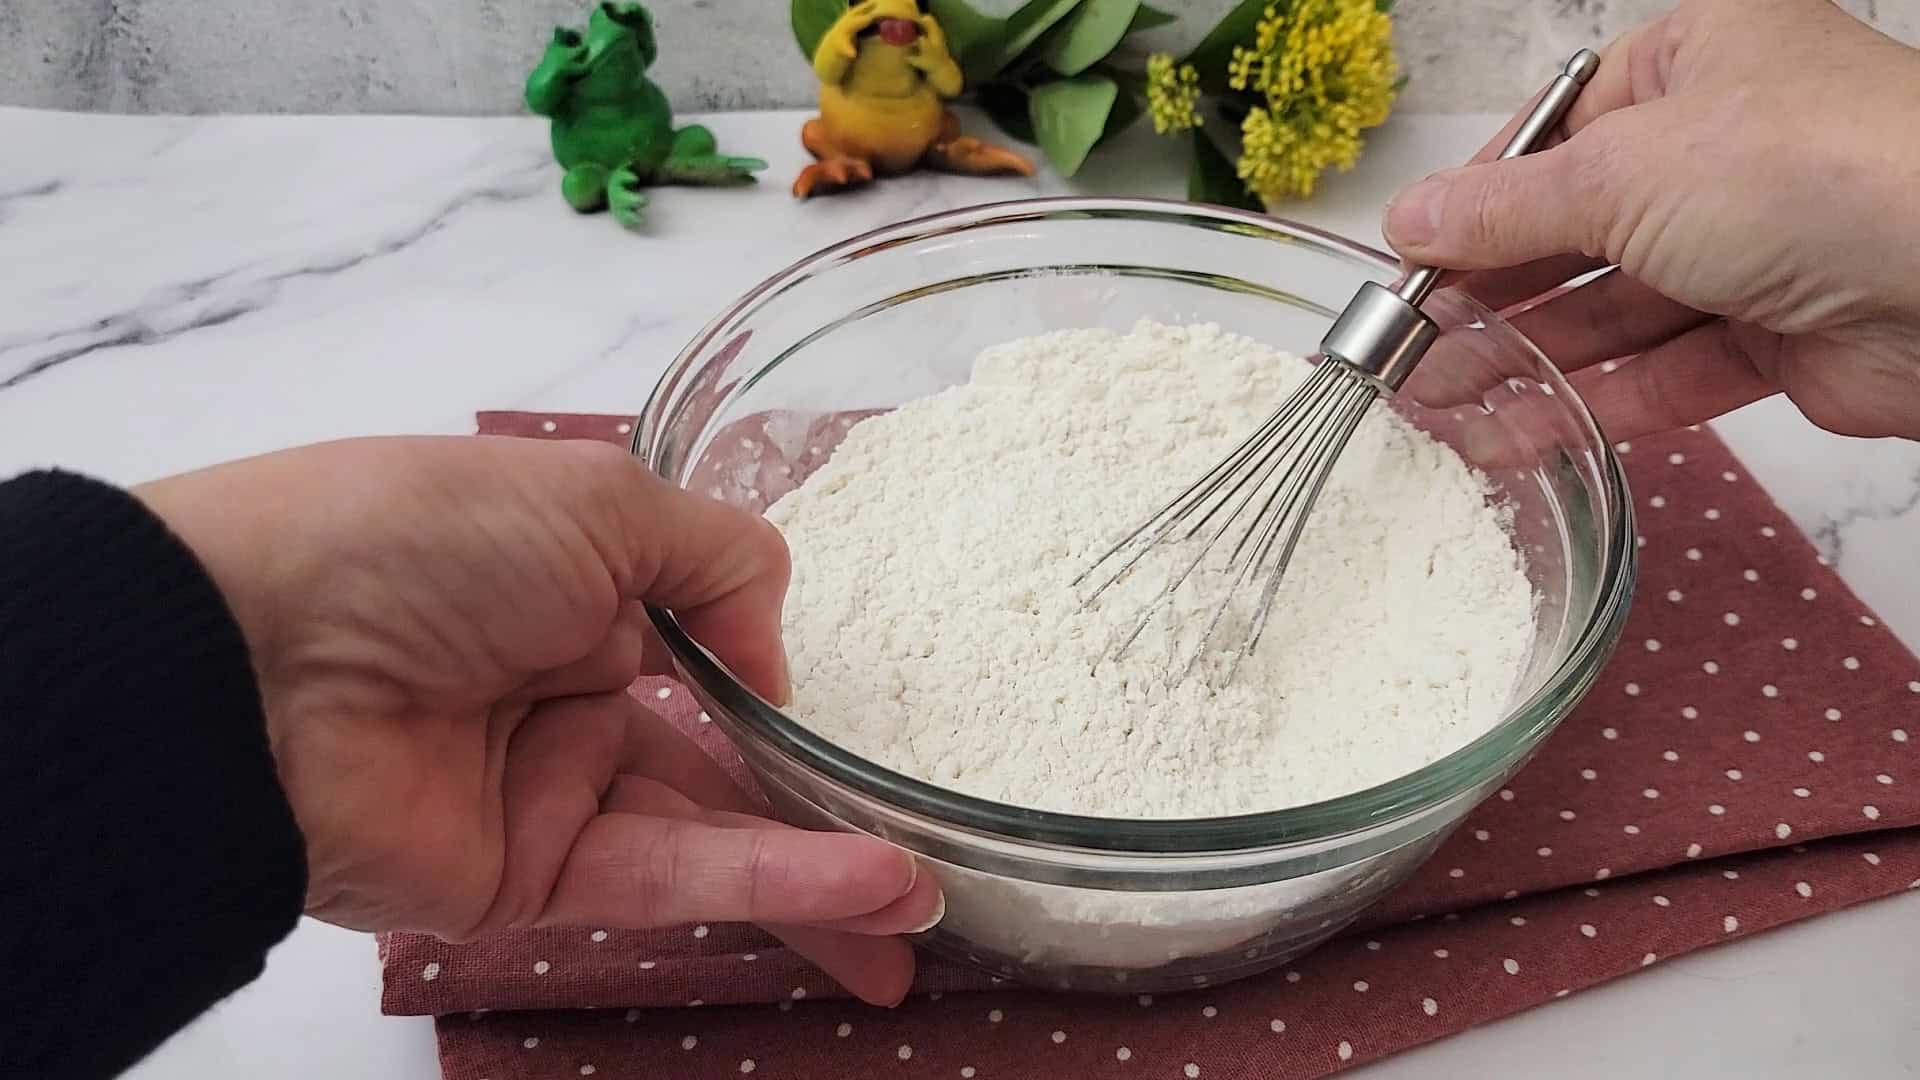
1 – Mix flour, salt and baking powder in a bowl. Sift if essential to take away any lumps.
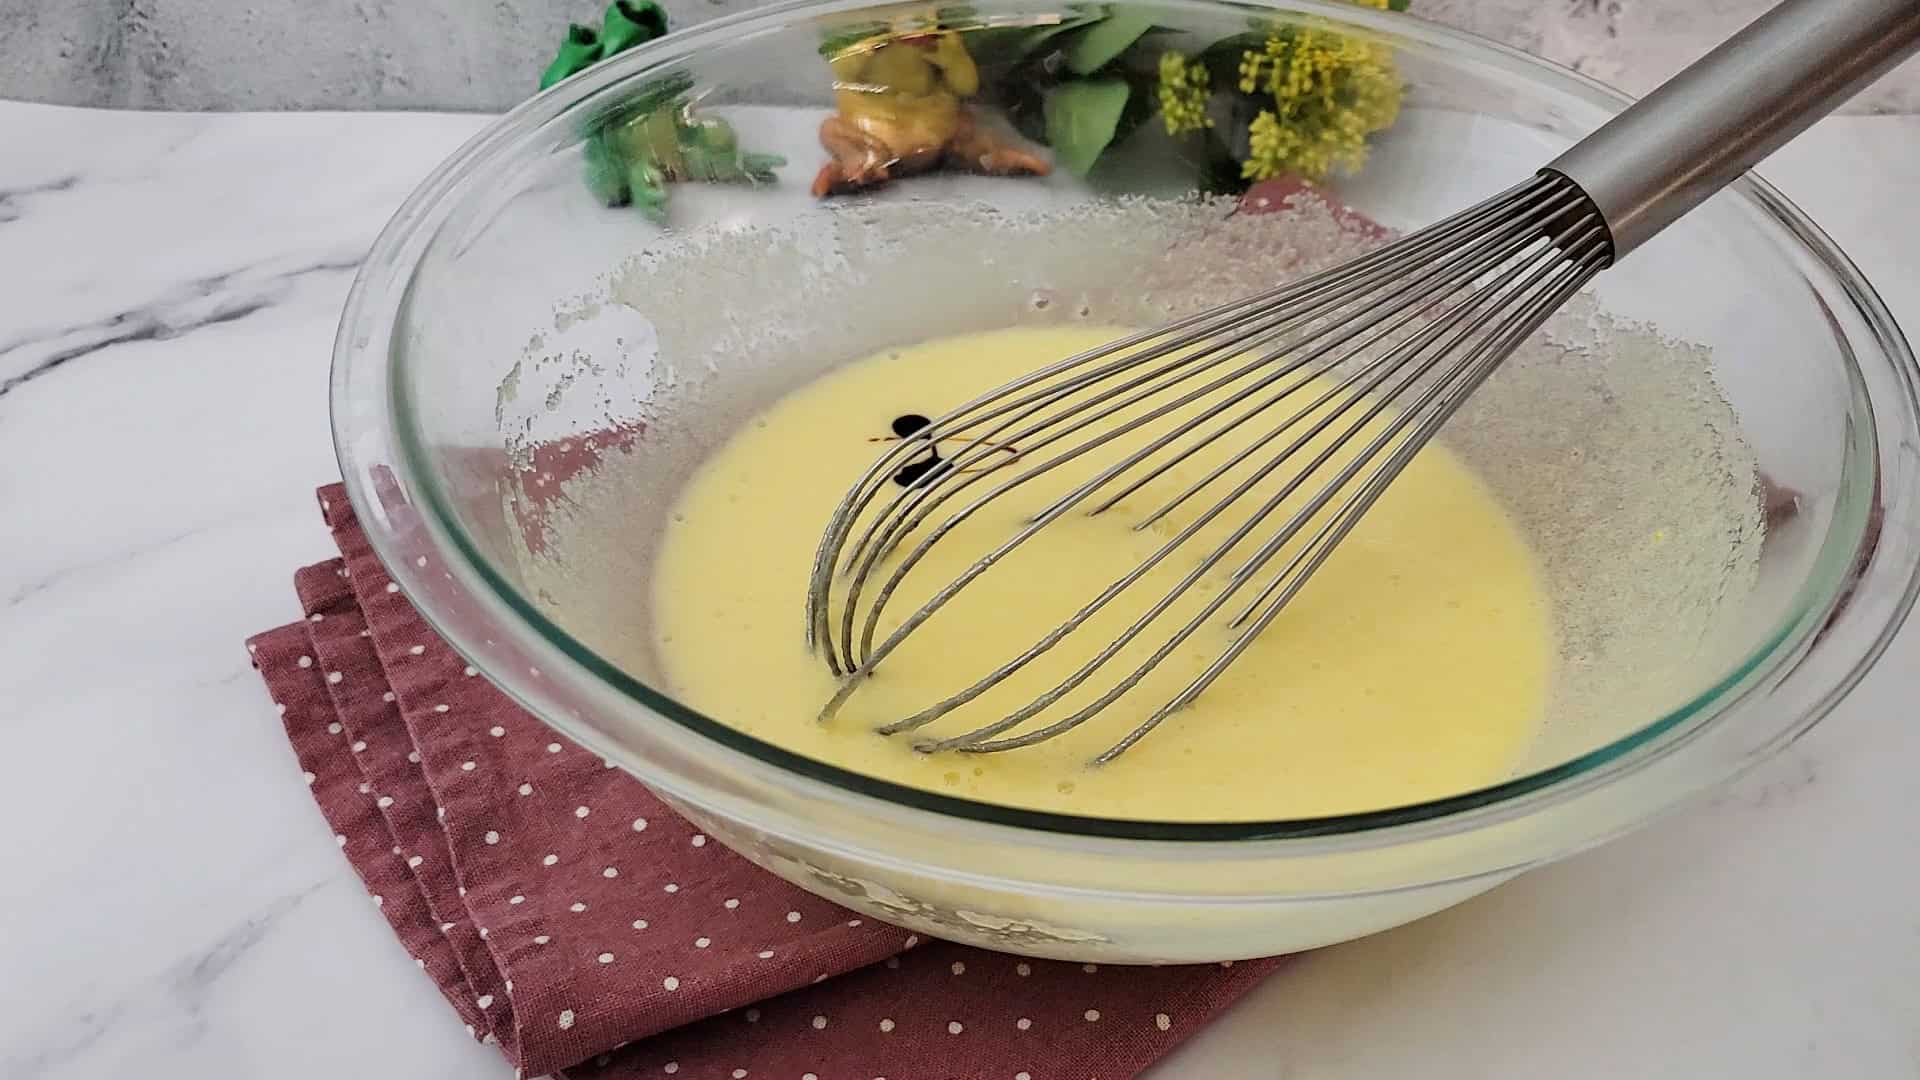
2 – Add sugar and eggs to a mixing bowl. Whisk till effectively mixed and the combination is pale (roughly 2 minutes). Word – an electrical hand- or stand-mixer may be used. Add vanilla and whisk till mixed.
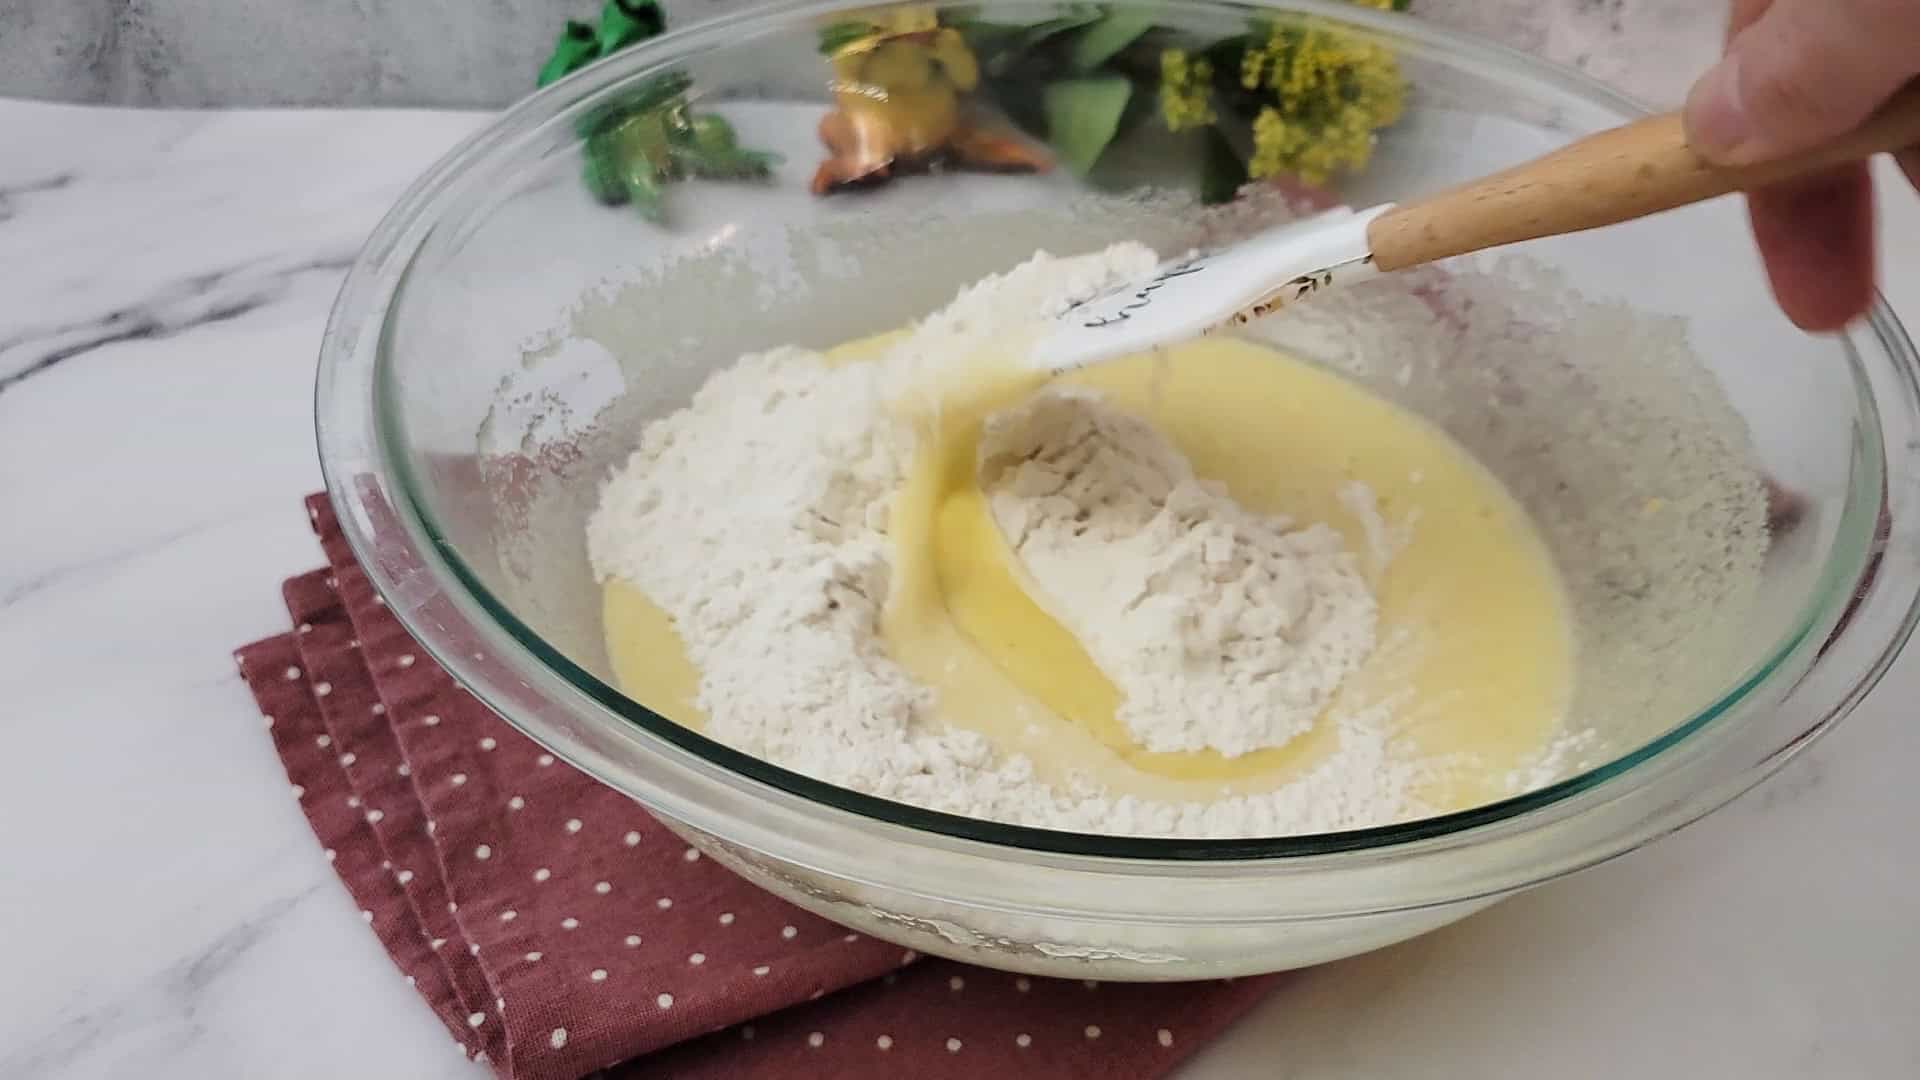
3 – Add one-third of the flour combination and stir till mixed.
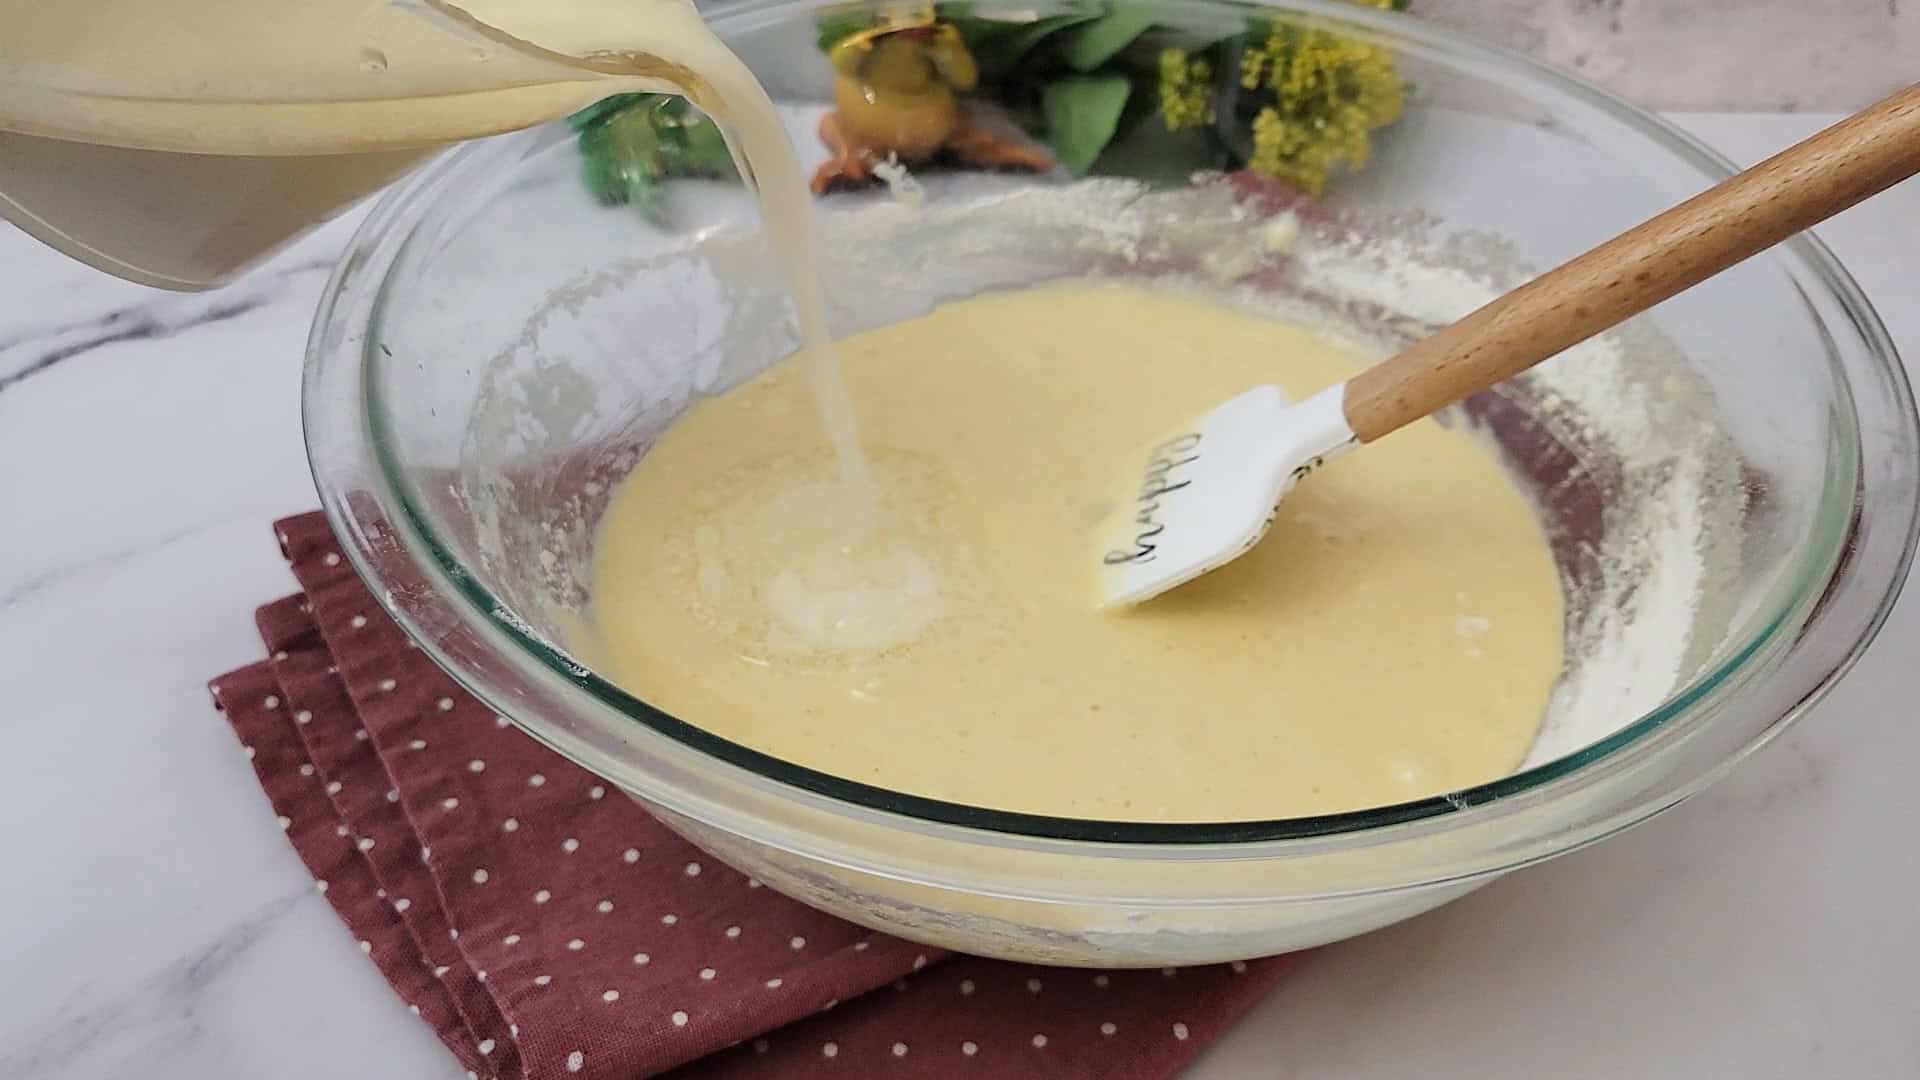
4 – Add one-half of the milk and vegetable oil and blend till mixed. Add one other third of the flour combination and blend until mixed. Add the remaining oil and milk and blend until easy
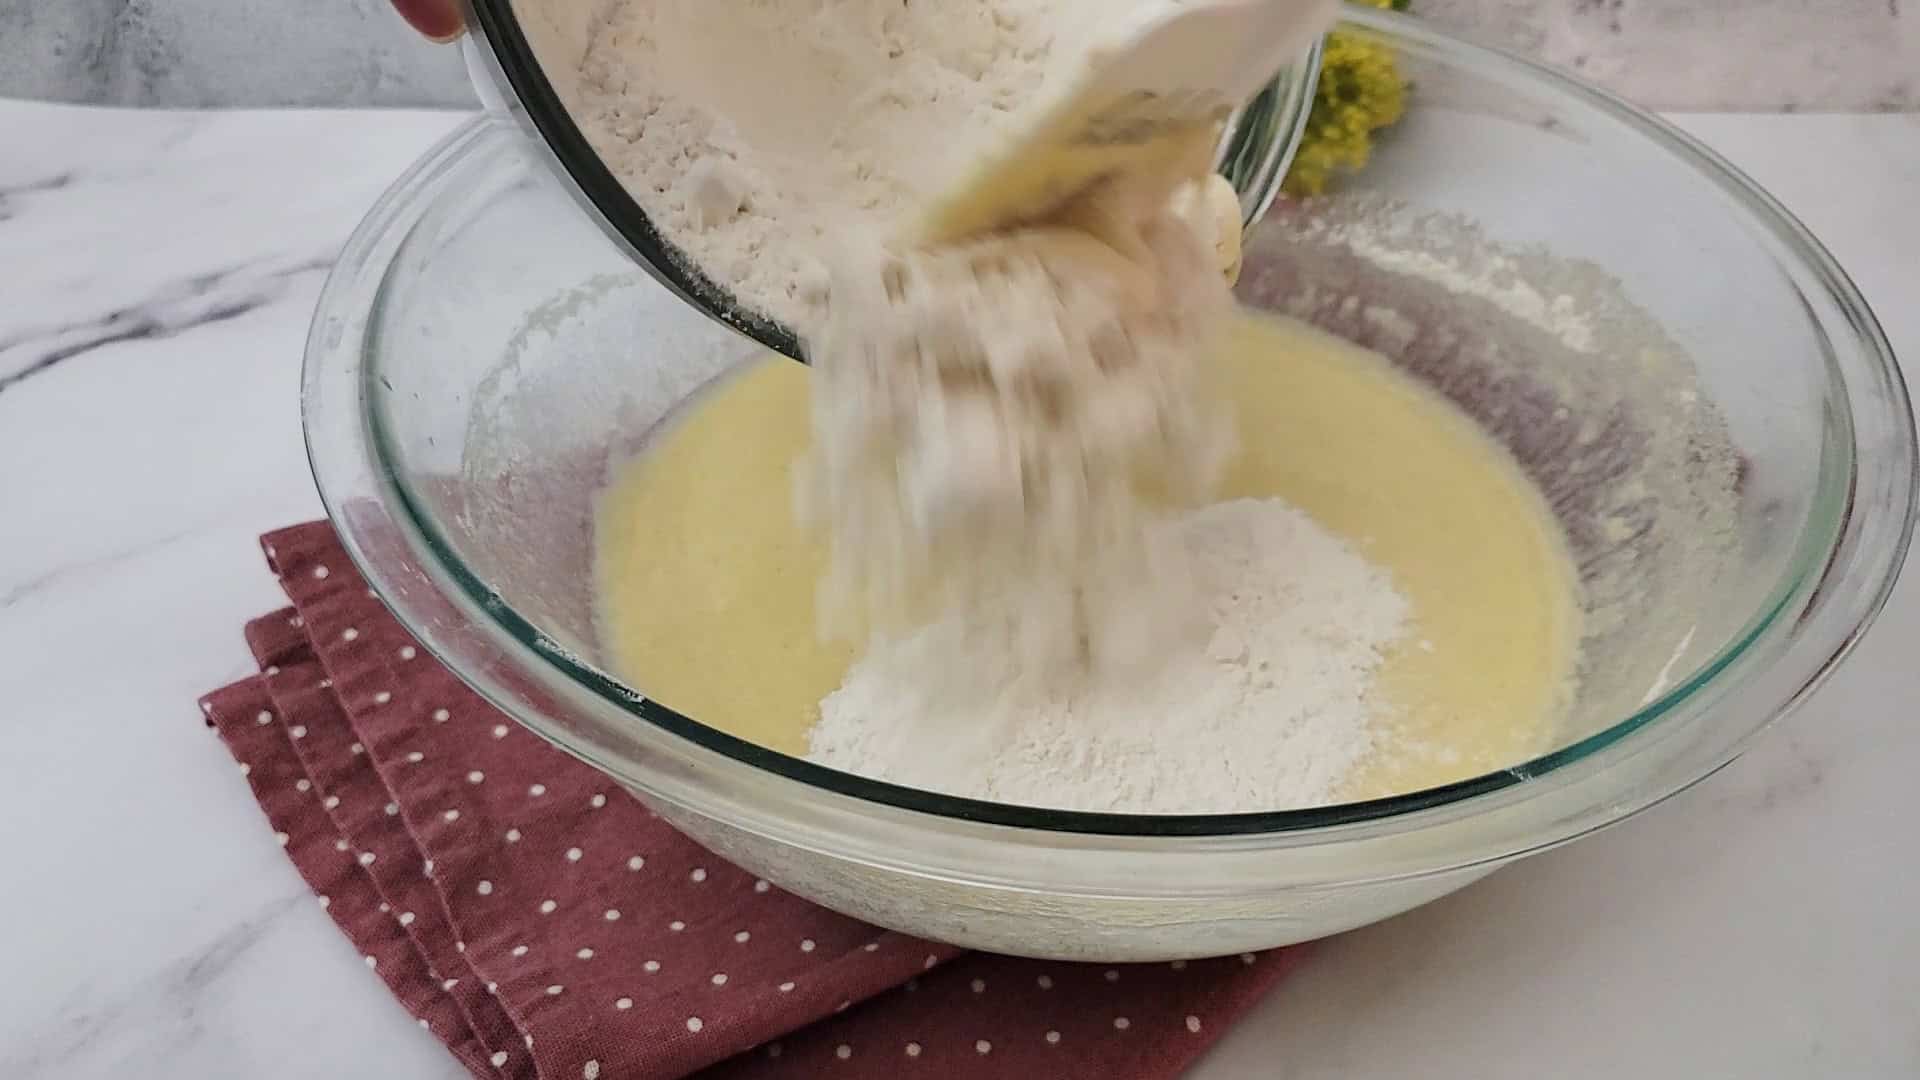
5 – Add remaining flour combination and blend till mixed.
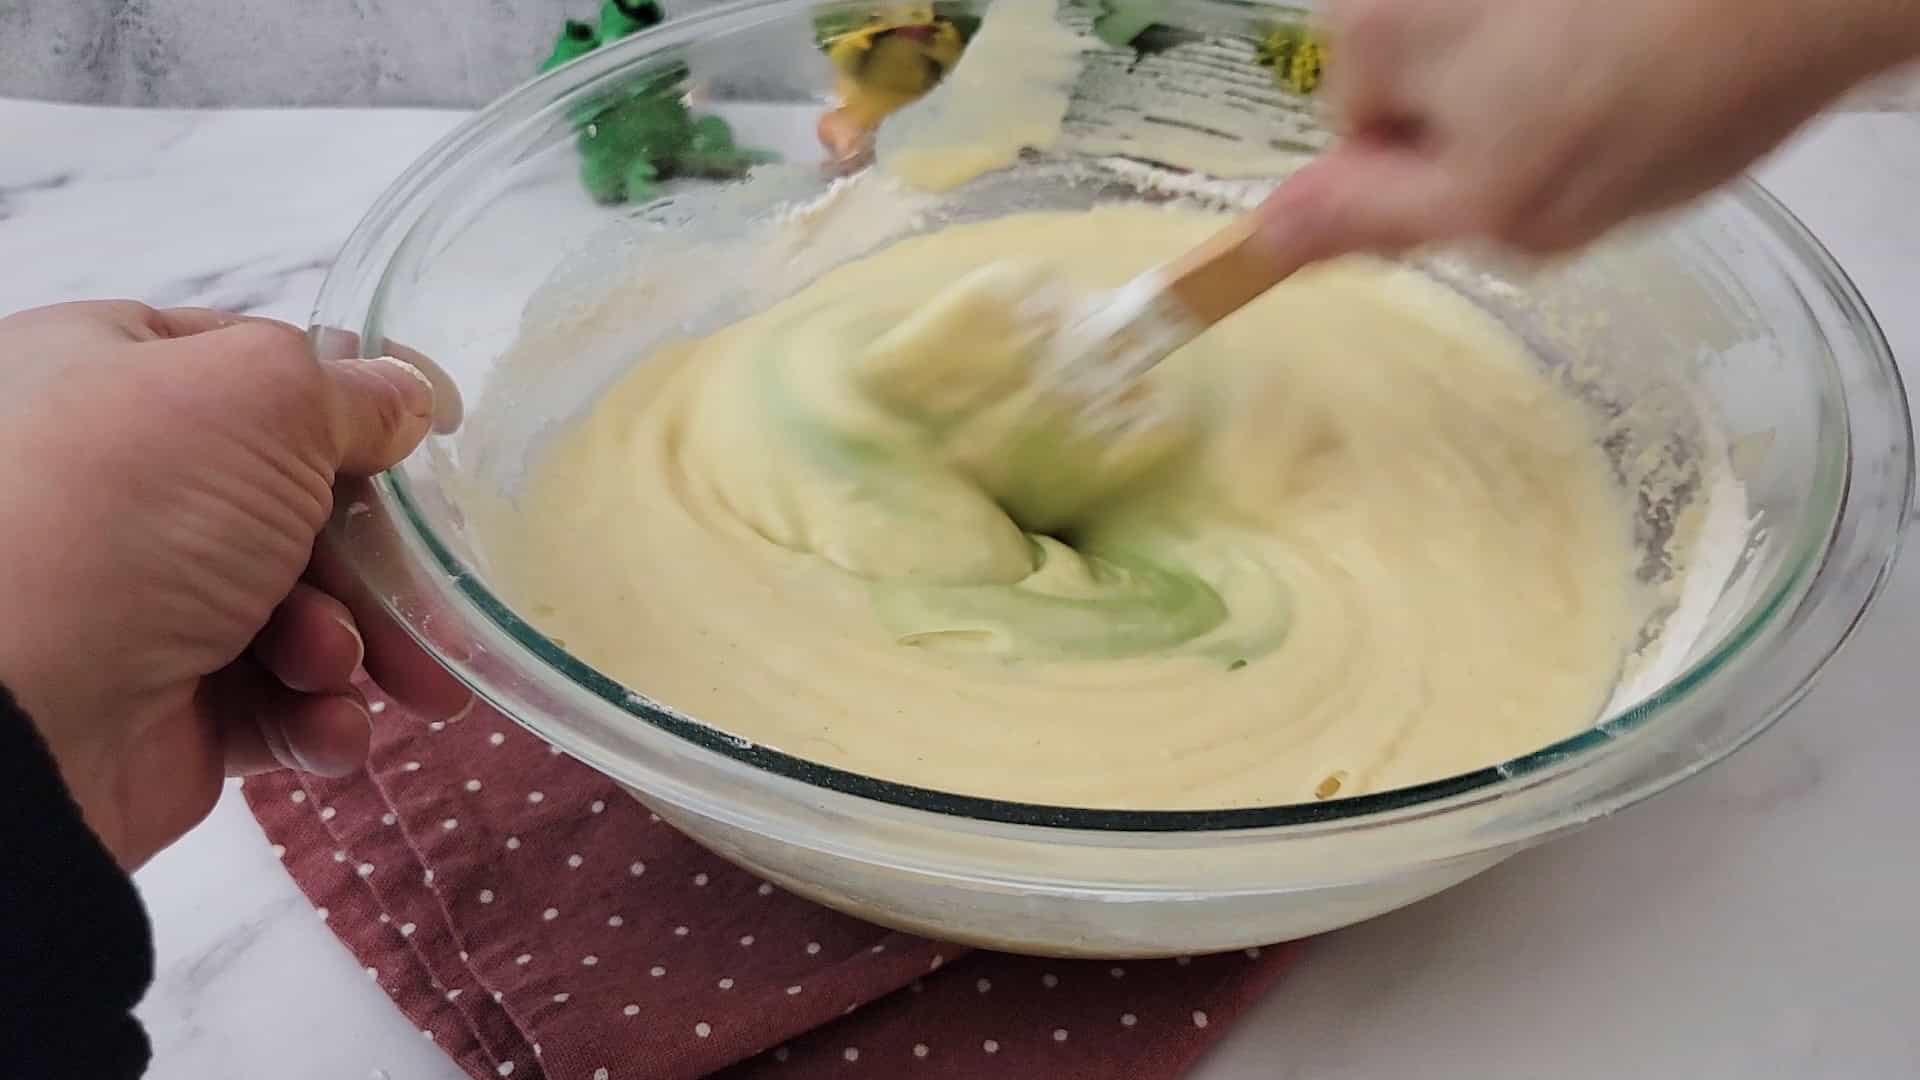
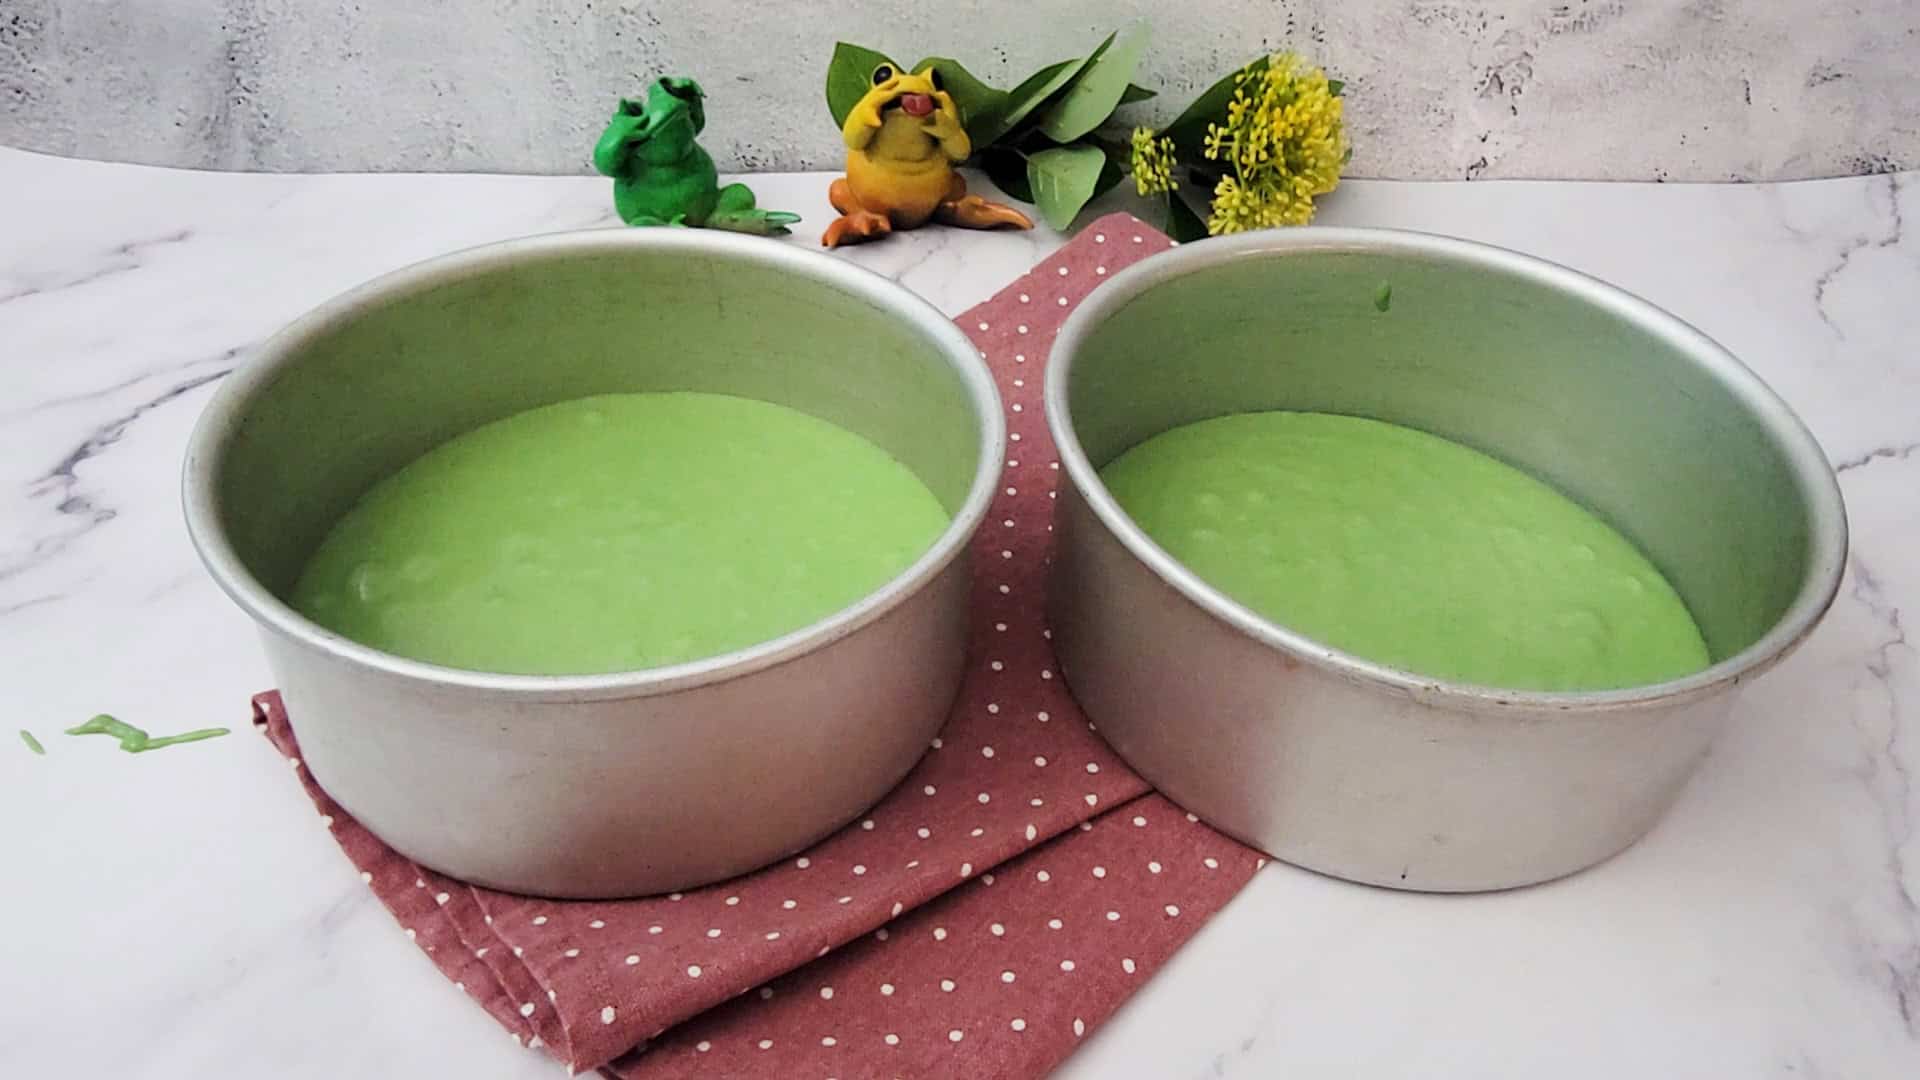
6 – Non-obligatory: add just a few drops of meals coloring of your selection
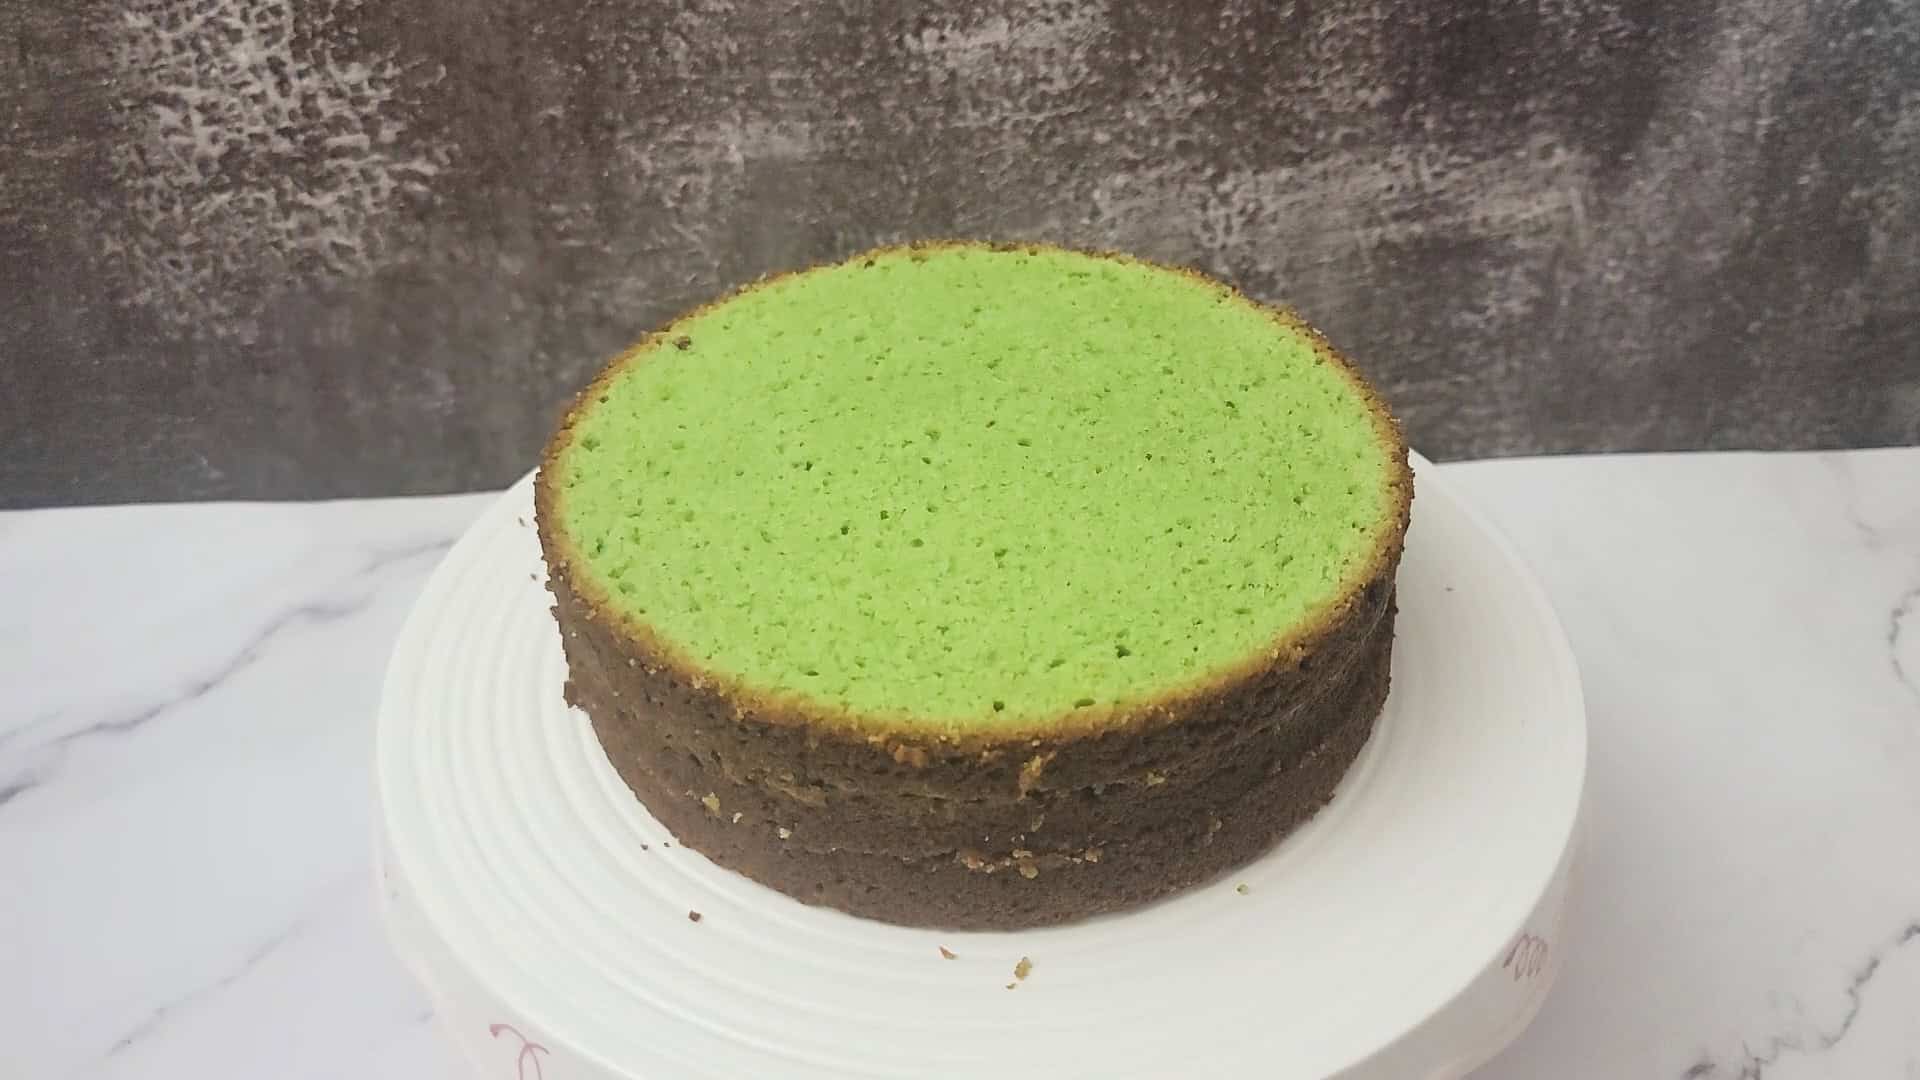
7 – Divide cake batter equally between two 8” pans. Bake at 350℉ (177℃) for 35 – 40 minutes, or till a toothpick inserted within the middle of the cake comes out clear.
Place pans on a wire rack and permit to chill fully earlier than unmolding.
Cream cheese buttercream directions
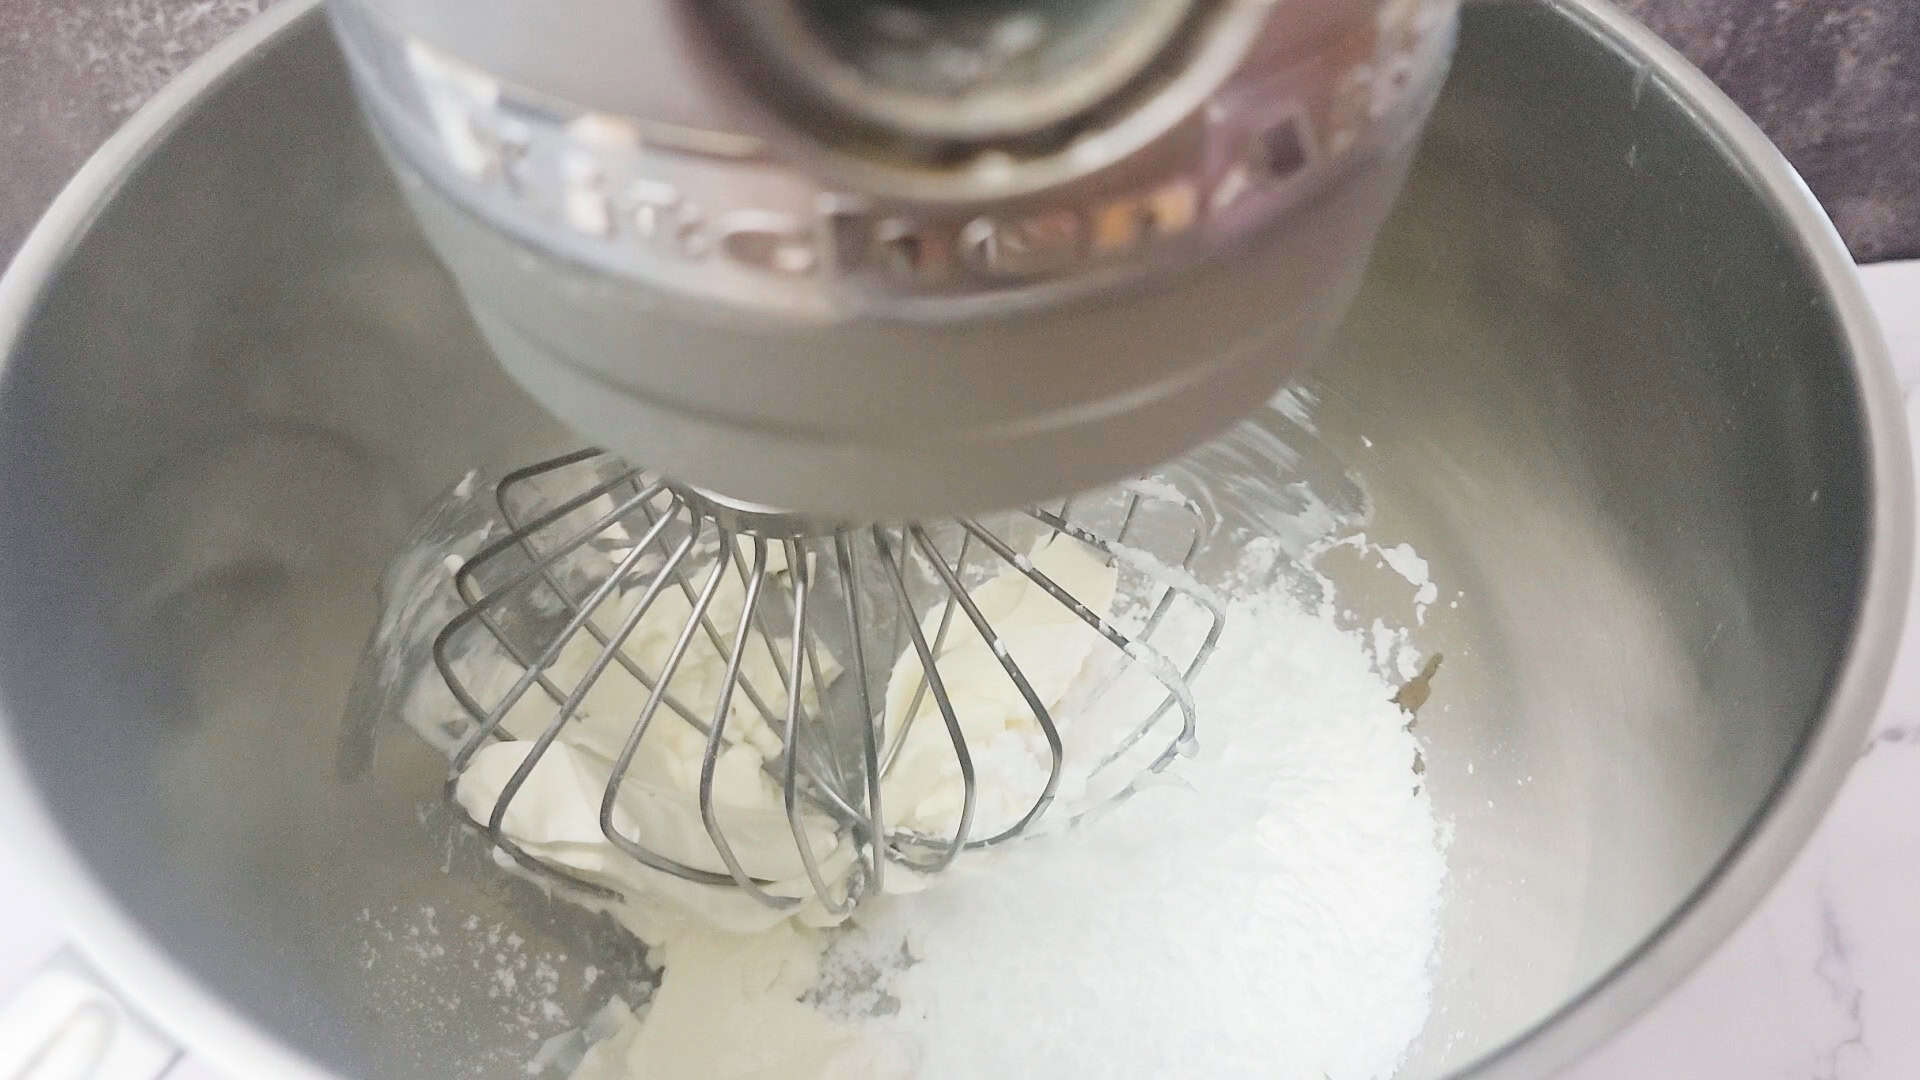
1 – Place cream cheese, vanilla and powdered sugar in a mixing bowl fitted with the whisk attachment. Whisk collectively till easy and effectively mixed.
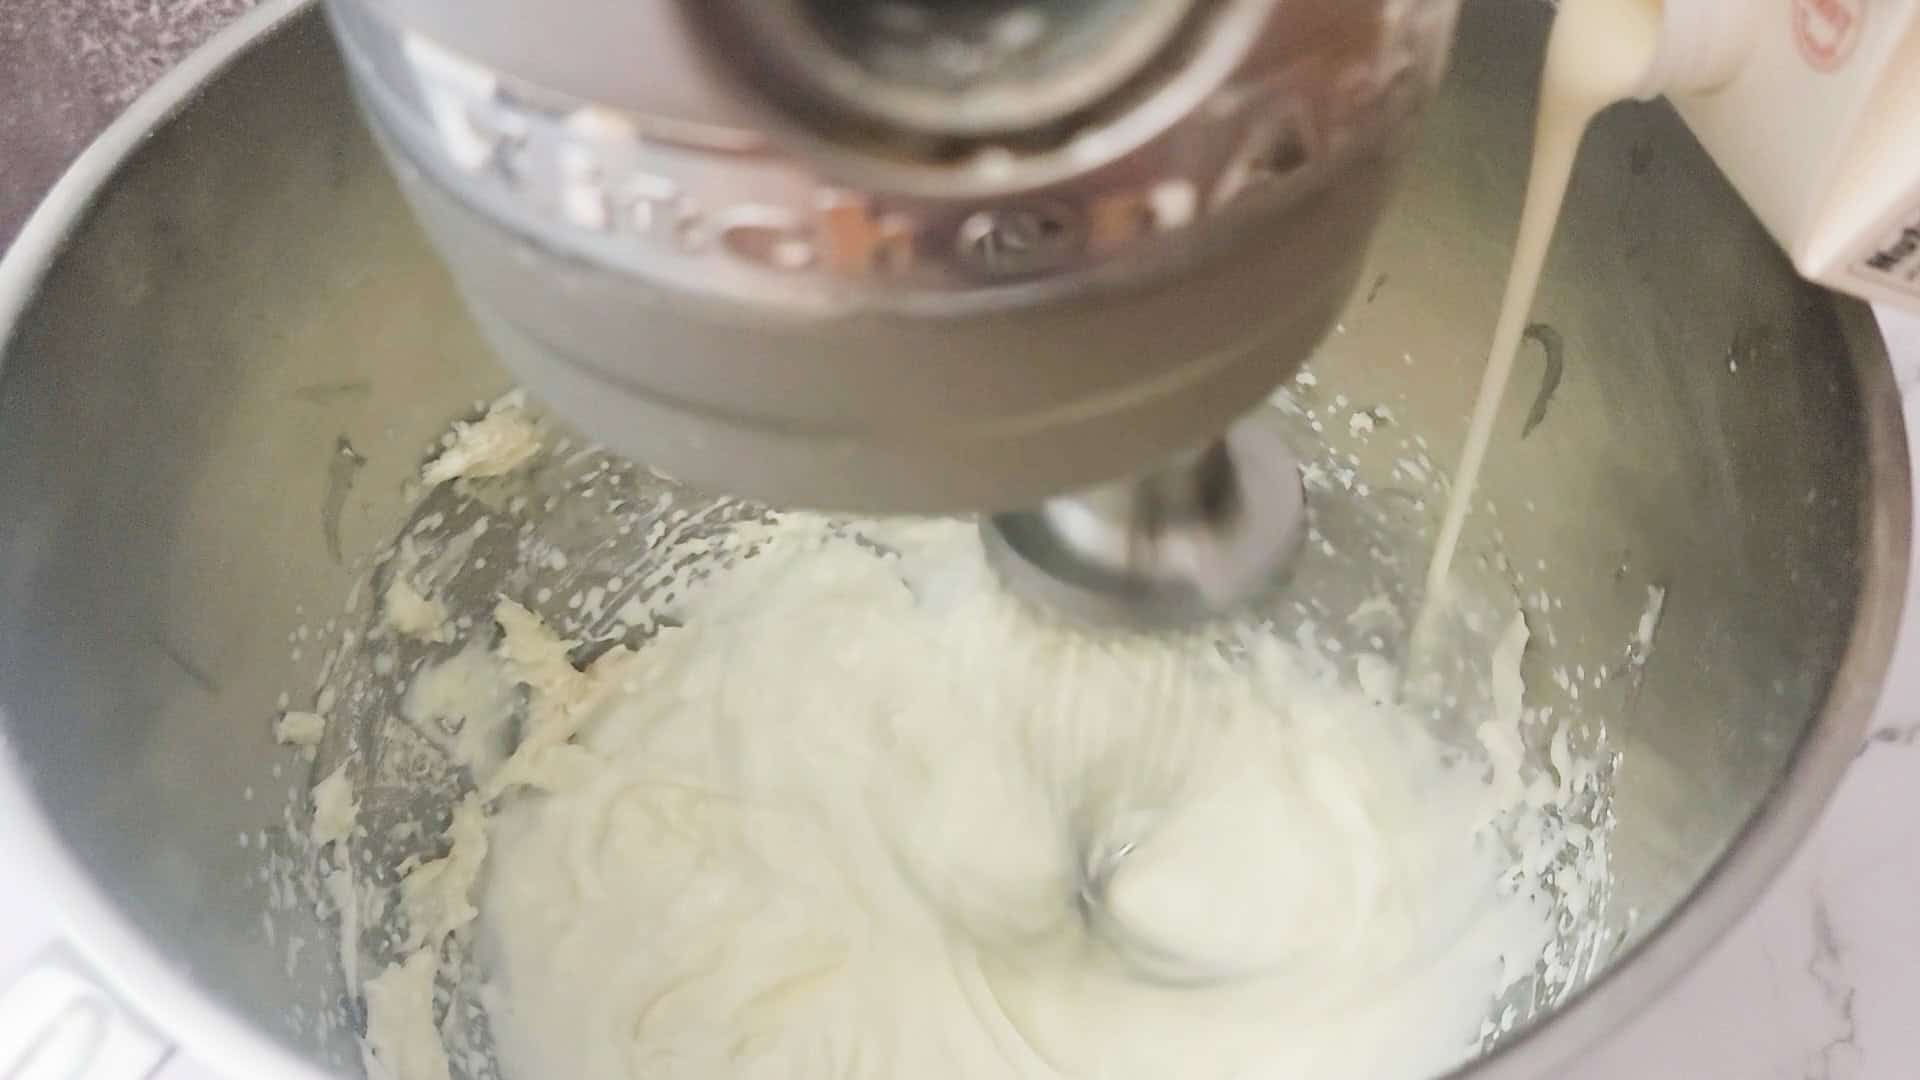
2 – With the mixer operating on medium pace, slowly start pouring heavy cream into the blending bowl. Make sure you pour slowly over the interval of 1 – 2 minutes. Enhance mixer pace to medium-high. Proceed to combine till stiff peaks type. The icing is now prepared for use. Refrigerate icing if not utilizing instantly.
Jelly Bean Cake meeting directions
Observe these steps, and shortly you will have a colourful, fun-filled Jelly Bean Explosion Cake to wow your loved ones and mates!
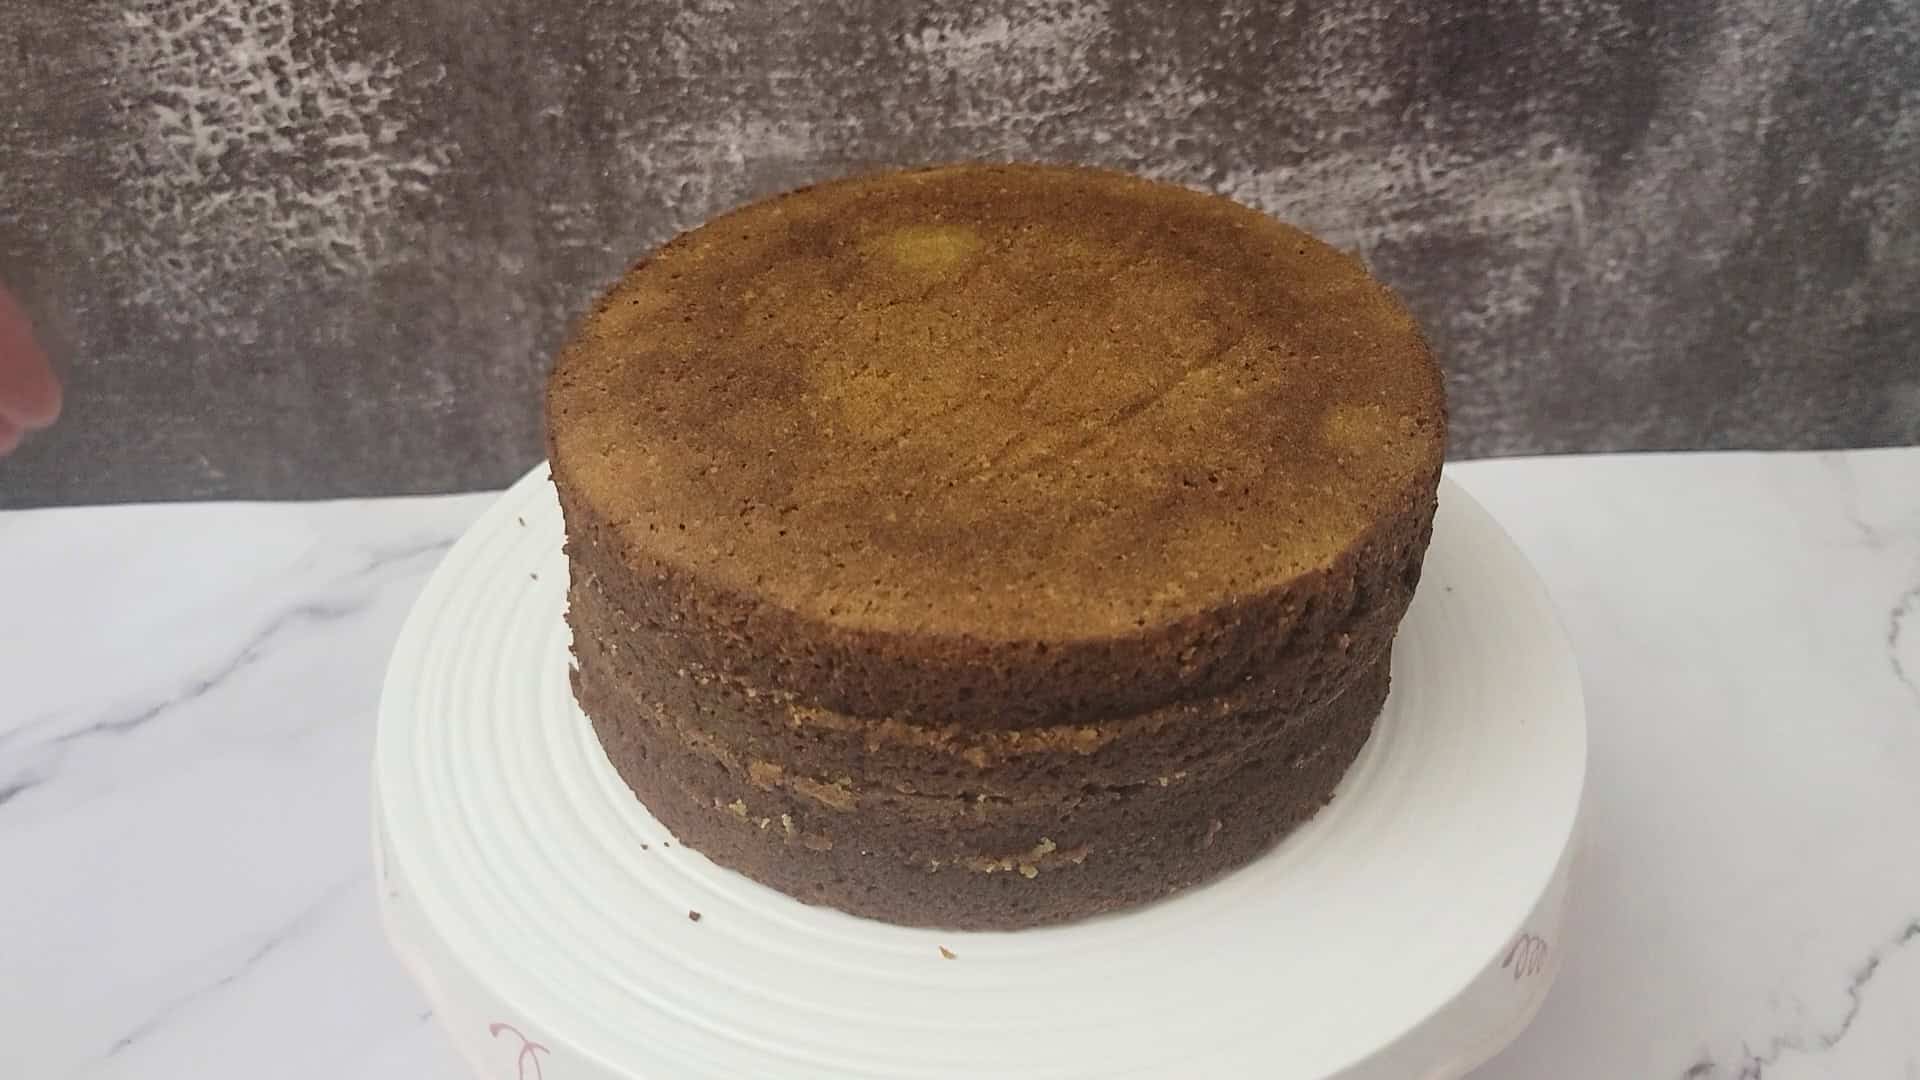
1 – Rigorously trim the dome off of every cake to create a flat floor. Then, slice every cake in half horizontally for a complete of 4 layers.
2 – Take away the highest layer and put aside for later.
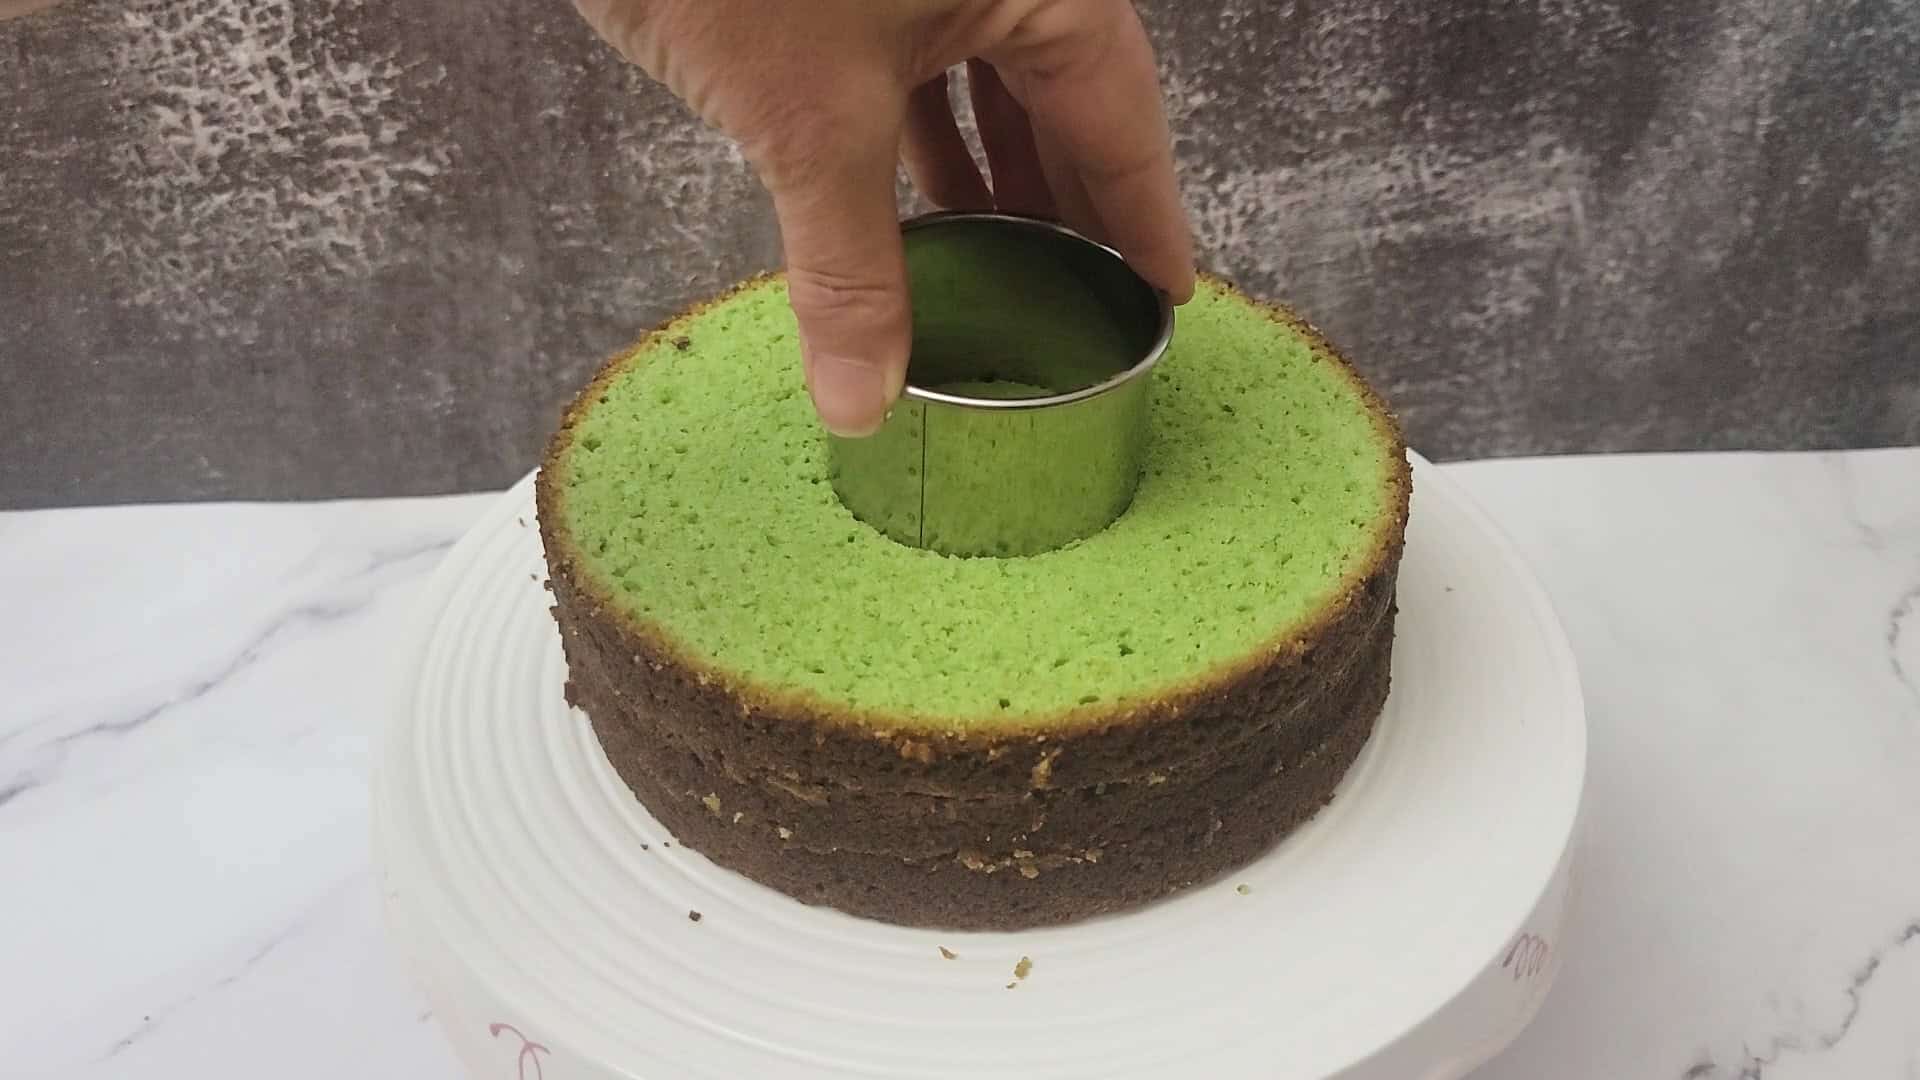
3 – Utilizing a 3 ½-inch spherical cookie cutter, lower a gap within the middle of the remaining three cake layers. This can create an area for the jelly beans to be poured into later.
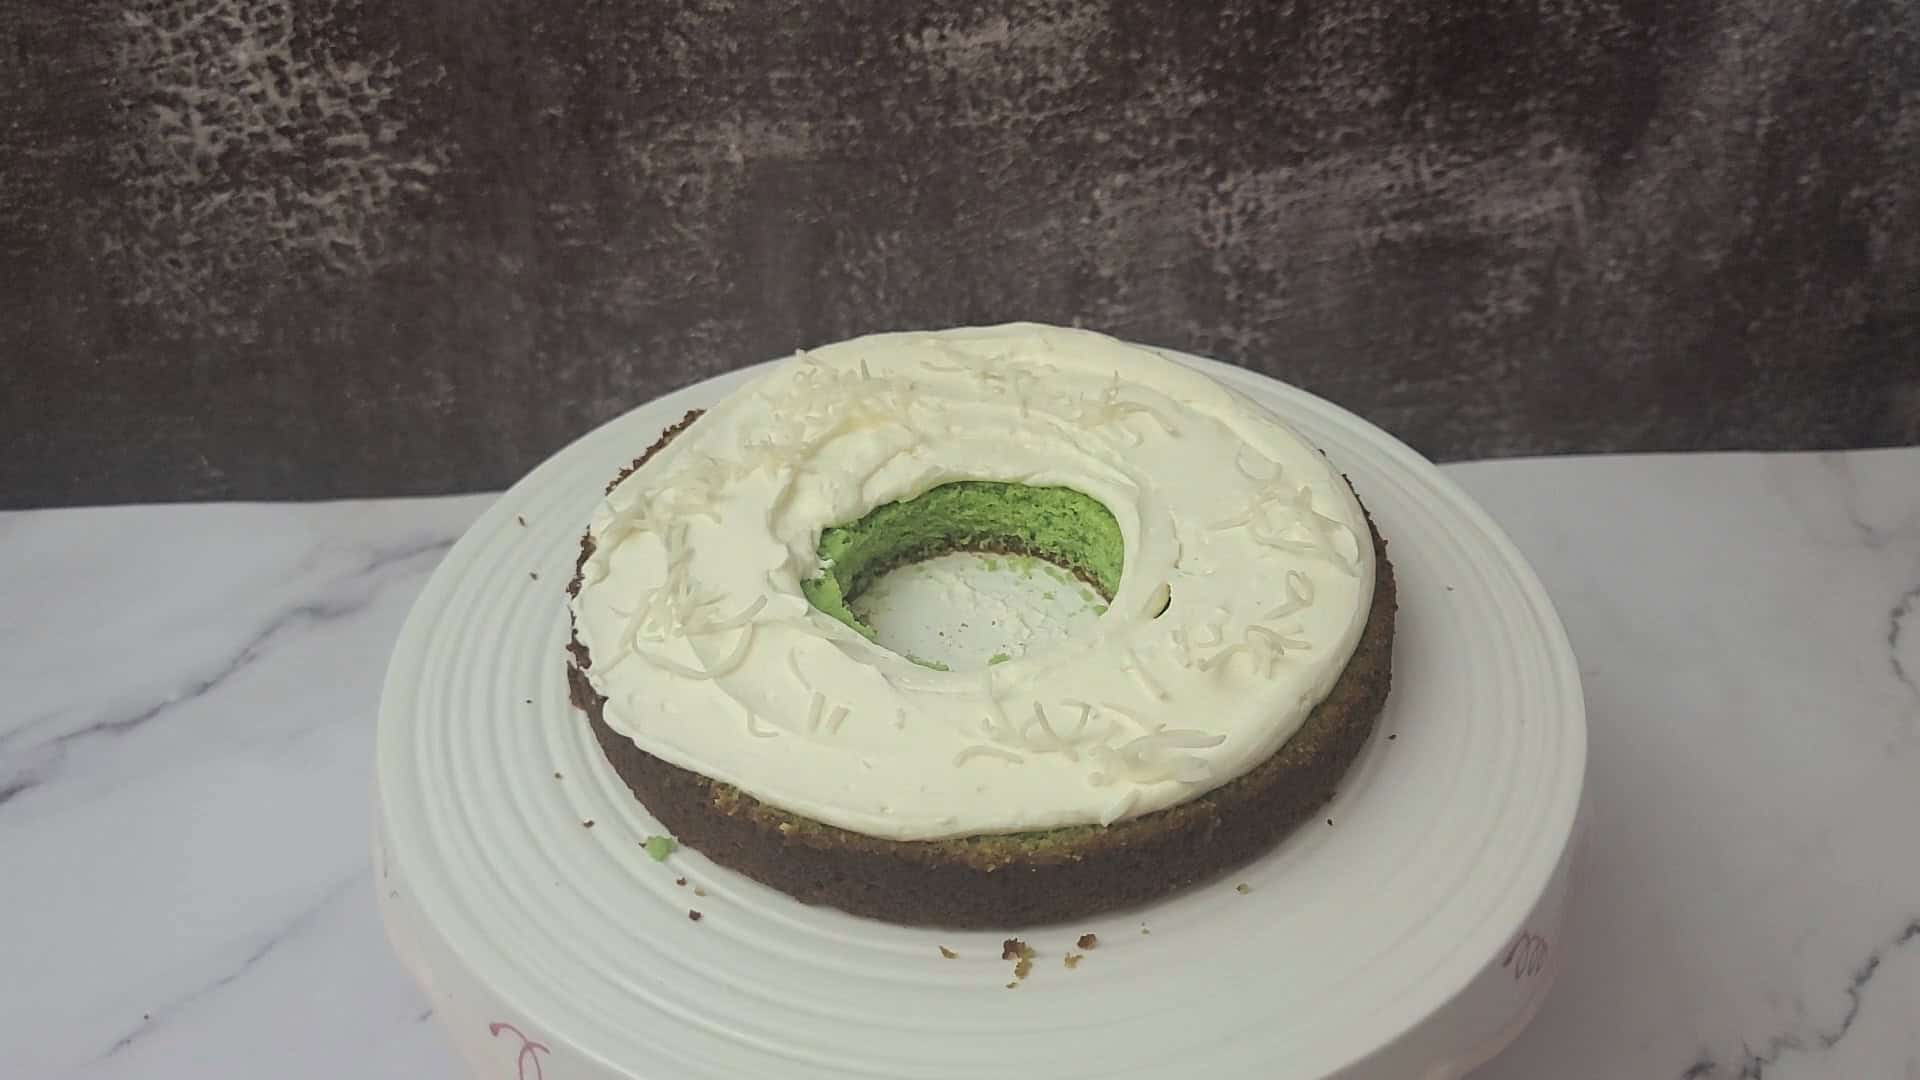
4 – Take away the 2 prime cake layers and put aside (it’s best to solely have one layer of cake in your serving dish). Add a easy ¼ inch layer of the cream cheese buttercream on prime of the cake. Sprinkle generously with toasted coconut.
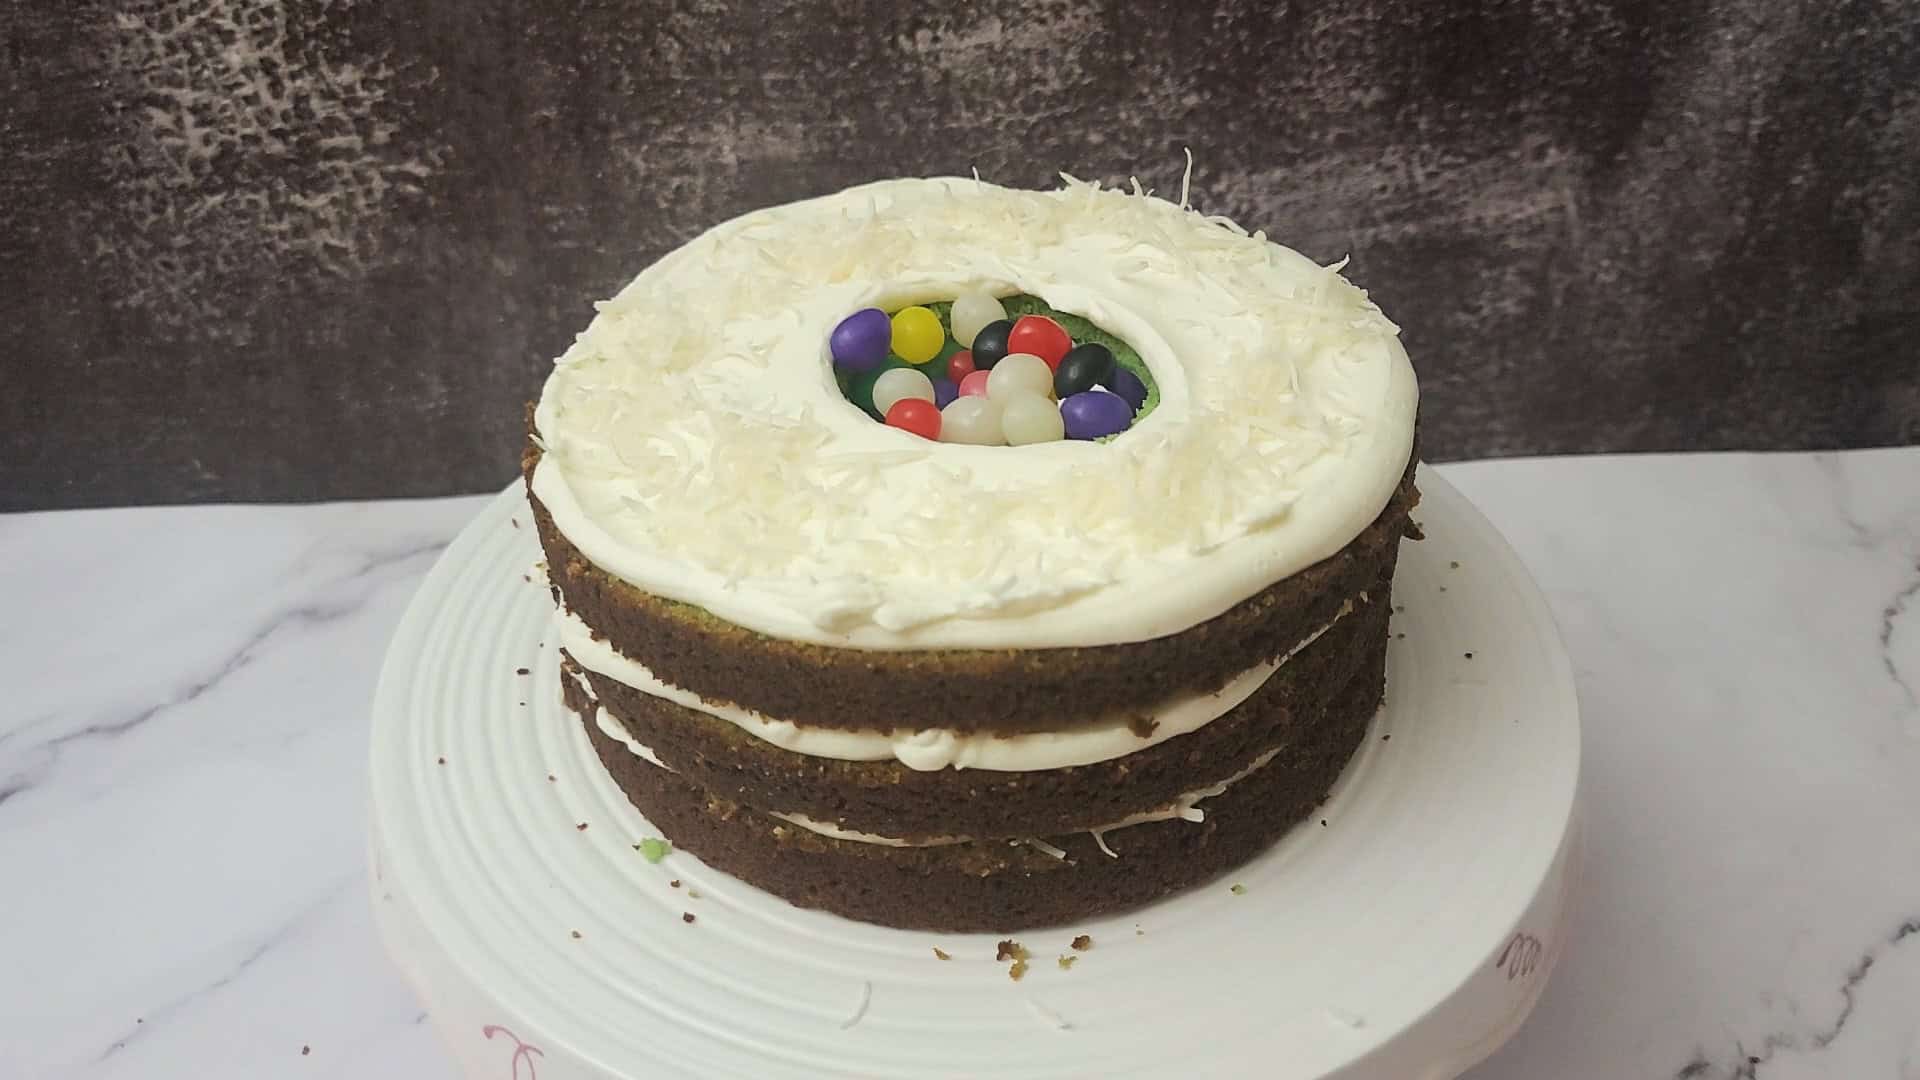
5 – Place the second layer of cake over the buttercream guaranteeing it’s centered and degree – and repeat the method of including buttercream and coconut. Repeat once more for the third layer of cake. Add jelly beans to fill the outlet within the cake.
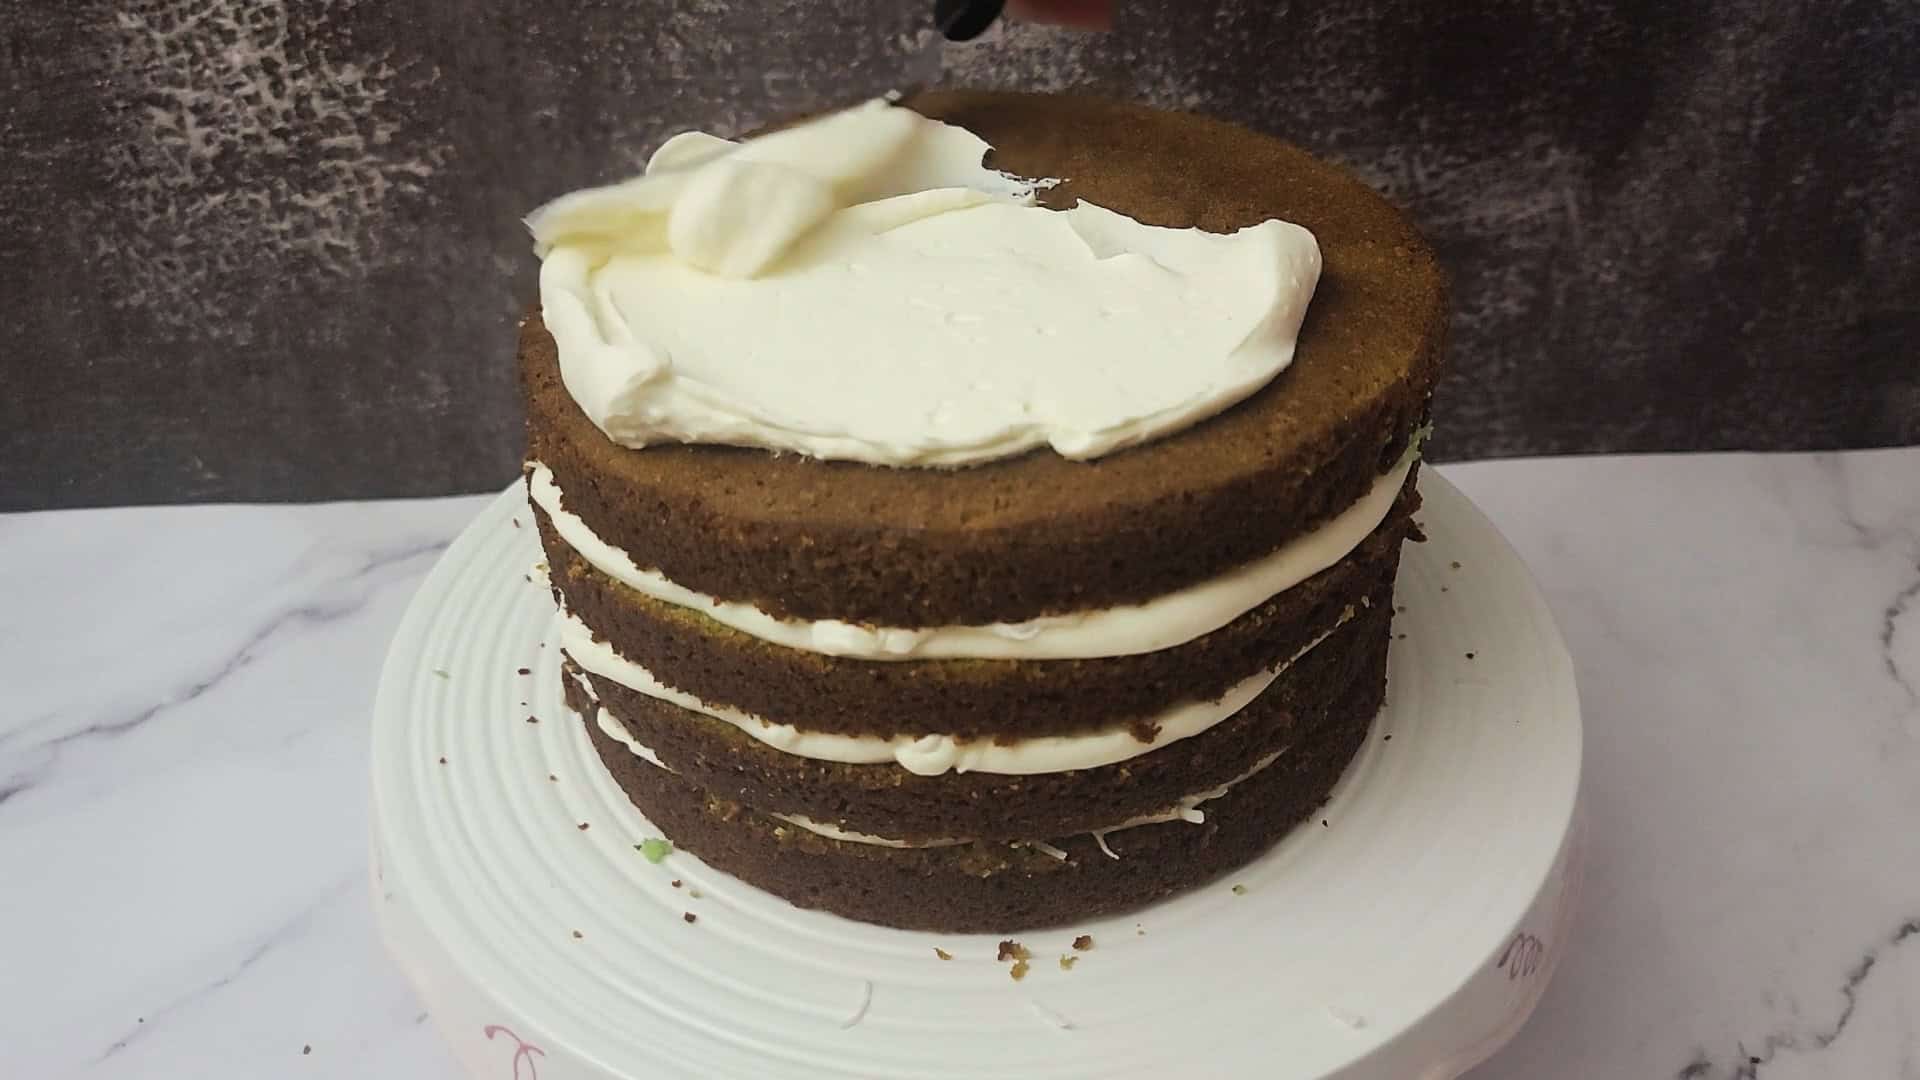
6 – Add the ultimate layer of cake, and ice the highest and sides of the cake with a easy layer of buttercream.

7 – Gently press shredded coconut to the perimeters of the cake and sprinkle excessive. Enhance as desired – think about including extra jelly beans, making buttercream flowers, or inserting bunny Peeps on prime. Slice, serve and revel in!
Variations
This dessert is extremely customizable, making it simple to regulate to your preferences. Listed below are just a few scrumptious methods to make it your personal:
- Gluten-free – exchange the all-purpose flour with a 1-to1 gluten-free flour. I like to recommend King Arthur or Bob’s Crimson Mill flours.
- Citrus – need a lemon, lime or orange flavored cake? Change the vanilla with 1 tablespoon citrus zest and 1 tablespoon recent juice.
Gear
Collect the next tools to make this jelly bean explosion cake:
- Two 8″ spherical cake pans (for a taller cake use two 7″ spherical cake pans)
- Hand Mixer or stand mixer
- Bowls, measuring cups and spoons
- Whisk and silicone spatula
- 3 ½» round cookie cutter – to make gap for filling with jelly beans
- Knife to separate cake layers
- Steel offset spatula
Storage
To maintain your Jelly Bean Cake recent, retailer it in an hermetic container within the fridge for as much as 4 days. If you’re able to serve it, take the cake out about an hour beforehand so it may possibly heat as much as room temperature. This helps carry out its wealthy taste and mushy texture.
The completed cake doesn’t freeze effectively because the jelly beans will stick collectively when defrosted.
High Tip
Make certain to not lower a gap by means of the highest layer of the cake—you’ll want it intact to maintain the jelly beans securely inside.
FAQ
It’s thought within the Nineteen Thirties, jelly beans turned a preferred a part of Easter traditions due to their egg-like form. This reminded folks of the Easter Bunny, who is alleged to ship eggs as a logo of latest life and the arrival of spring.
Extra Easter dessert concepts
On the lookout for extra inspiration in your Easter dessert desk? Try these recipes:
I hope you get pleasure from this Jelly Bean Cake as a lot as my household and mates do!
📋 Recipe
Jelly Bean Explosion Cake
Rejoice Easter with a scrumptious Jelly Bean Coconut Cake stuffed with taste and a enjoyable jelly bean shock inside.
Gear
-
2 8″ Cake Pans spherical pans
-
Bowls, measuring cups and spoons
-
Whisk and silicone spatula
-
3 ½» spherical cookie cutter to make gap for jelly beans in cake layers
-
Knife to separate cake layers
-
Steel offset spatula
Components
Vanilla cake
- 3 Cups All Purpose Flour
- 2 ½ teaspoons Baking Powder
- ½ teaspoon Salt
- 2 Cups Granulated Sugar
- 4 Giant Eggs Room Temperature
- ⅔ Cup Vegetable or Canola Oil
- ⅔ Cup Complete Milk Room Temperature
- 1 ½ teaspoon Vanilla Bean Paste or Vanilla Extract
- Non-obligatory: meals coloring use your selection of meals coloring
Cream cheese frosting
- 1 Cup Cream cheese, full fats softened (notice – one cup equals one 8 ounce package deal)
- ¾ Cup Powdered sugar
- 2 Cups Heavy whipping cream softened
- 1 teaspoon Vanilla bean paste or vanilla extract
Jelly Bean Filling & Coconut Overlaying
- 2 Cups Jelly beans
- 2 Cups Coconut Shredded
Directions
Vanilla Cake
-
Put together two 8-inch cake pans by lining with parchment paper or coating with baking spray.
-
Mix flour, salt and baking powder in a bowl. Sift if essential to take away any lumps.
-
Add sugar and eggs to a mixing bowl. Whisk till effectively mixed and the combination is pale (roughly 2 minutes). Word – an electrical hand- or stand-mixer may be used.
-
Add vanilla bean paste or vanilla extract to bowl and blend till mixed. Scrape sides of bowl with a spatula as wanted.
-
Add one-third of the flour combination and blend till mixed. Add one-half of the milk and vegetable oil and blend till mixed. Add one other third of the flour combination and blend until mixed. Add the remaining oil and milk and blend until easy. Lastly, add remaining flour combination and blend till mixed.
-
Non-obligatory: add just a few drops of meals coloring of your selection
-
Divide cake batter equally between two 8” pans.
-
Bake at 350℉ (177℃) for 35 – 40 minutes, or till a toothpick inserted within the middle of the cake comes out clear.
-
Place pans on a wire rack and permit to chill fully earlier than unmolding.
Cream cheese buttercream
-
Place room temperature cream cheese in bowl of a stand mixer fitted with the whip attachment.
-
Add powdered sugar and vanilla to bowl.
-
Start mixing on low pace and progressively enhance pace to medium.
-
Proceed to combine till no lumps are current (2 – 3 minutes). Scrape the aspect of the bowl if wanted.
-
With the mixer operating on medium pace, slowly start pouring heavy cream into mixing bowl. Make sure you pour slowly over the interval of 1 – 2 minutes.
-
Enhance mixer pace to medium-high. Proceed to combine till stiff peaks type. The icing is now prepared for use.
-
Refrigerate icing if not utilizing instantly.
Cake Meeting
-
Rigorously trim the dome off of every cake to create a flat floor. Then, slice every cake in half horizontally for a complete of 4 layers.
-
Place layers on a serving platter.
-
Take away the highest layer and put aside for later.
-
Utilizing a 3 ½-inch spherical cookie cutter, lower a gap within the middle of the remaining three cake layers. This can create an area for the jelly beans to be poured into later.
-
Take away the 2 prime cake layers and put aside (it’s best to solely have one layer of cake in your serving dish).
-
Add a easy ¼ inch layer of the cream cheese buttercream on prime of the cake. Sprinkle generously with toasted coconut.
-
Place the second layer of cake over the buttercream guaranteeing it’s centered and degree – and repeat the method of including cream cheese buttercream and coconut
-
Repeat once more for the third layer of cake.
-
Add jelly beans to fill the outlet within the cake
-
Add the ultimate layer of cake, and ice the highest and sides of the cake with a easy layer of buttercream.
-
Gently press shredded coconut up the perimeters of the cake and sprinkle excessive.
-
Enhance as desired – think about including extra jelly beans, making buttercream flowers, or inserting bunny Peeps on prime.
-
Slice, serve and revel in!
Video

Notes
- Storage: To maintain your Jelly Bean Cake recent, retailer it in an hermetic container within the fridge for as much as 4 days. If you’re able to serve it, take the cake out about an hour beforehand so it may possibly heat as much as room temperature. This helps carry out its wealthy taste and mushy texture.
- Make certain to not lower a gap by means of the highest layer of the cake—you’ll want it intact to maintain the jelly beans securely inside.
Diet
Energy: 736kcalCarbohydrates: 96gProtein: 9gFats: 40gSaturated Fats: 20gPolyunsaturated Fats: 8gMonounsaturated Fats: 9gTrans Fats: 0.1gLdl cholesterol: 128mgSodium: 302mgPotassium: 198mgFiber: 2gSugar: 57gVitamin A: 949IUVitamin C: 1mgCalcium: 127mgIron: 2mg